Saturday, September 19, 2015

September Favorites!


      Howdy all!  I had every intention of trying to film this weekend just to try out a different style of blogging, but the kiddos has absolutely no interest in cooperating and making that happen. Amelia even figured out how to climb up out of her crib this past week.  So we have been in a special kind of hell while Dad is gone (lucky bastard).

      I only have a few short days left at home before I make a run for it, so I thought it would be a great time to share some of my favorite picks for September.  As a side note none of these choices are specific to September or particularly new.  It's just some things I am digging this month.


Books: Ready Player One


     Very few books I like well enough to read more than once.   This is my third time through Ready Player One.  I am kinda "cheating" here as I am actually listening to it on Audible (www.Audible.com for a free 30 day trial - it is SO worth it).  But I actually HIGHLY recommend listening to this book (versus reading) as it is narrated by the adorable Will Wheaton, who may very well be every nerdy girls' crush in the 90s. Admit it you watched Star Trek: TNG for Wesley and SeaQuest for Jonathan Brandis (don't judge).

     Anyway, I digress, Ready Player One is the futuristic tale where much of life is spent in an virtual  reality world called OASIS.  The creator of this utopia hid puzzles within it's world, promising fortune and glory to the person who could find and solve the puzzles first.  Enter in the main character Wade, a down on his luck teenage boy who has dedicated his minimal resources to finding the initial clues.   

    As a fair warning, this book is FILLED to the brim with pop culture references.  Sometimes they span on for pages.  For someone who spent much of her childhood watching movies, this was a fun trip down nostalgia lane.  For others who may not get all the references, this might be a bit tedious.  Even still the story is fun, fairly fast paced, and is single-handedly responsible for my World of Warcraft addiction. 


Movies/TV: The X-Files 


      So you may have heard, but Fox has officially announced that they are bringing The X-Files back for a limited episode running.  It probably isn't "normal" how excited I was when I heard this news.  So excited, that I decided to go back and re-watch the original 8 seasons (they are currently streaming on both Netflix and Amazon Prime).  

     Yes, the special effects have aged a bit, and the technology outdated (I laughed at the brick cell phones they carry around).  But Mulder is still the stuff of dreams, and the developing relationship between Mulder and Scully watched now as an adult is so much more nuanced.  I find myself appreciating episodes that focused more on the characters themselves rather than the creepy paranormal episodes I preferred at a younger age. 

Music: Monthly Mixed Tape! 


   Asking me to pick one band, or one song, even just one album is akin to asking me to pick my favorite child...I could perhaps narrow it down to... LOL just kidding!  Picking a favorite song is WAY harder than picking a favorite child :P  So each month I thought I'd share some of what I am listening to and a link for you to check them out yourself!  Enjoy! 

2. I'm Not Jesus - Apocalyptica ft. Corey Taylor (https://www.youtube.com/watch?v=PMLsF8ajI6U)
4. The Bleeding - Five Finger Death Punch (https://www.youtube.com/watch?v=KAuyEG7JPbE)
5. The City Ignites - 36 Crazyfists (https://www.youtube.com/watch?v=XuZclmz4eXY)
7. Lost at Sea - In This Moment (https://www.youtube.com/watch?v=Pd2uFLat6dY)
8. Drown - Theory of a Deadman (https://www.youtube.com/watch?v=DKZ2PLTPYP8)


Website: www.Trump-your-pet.com

     My friend Amanda set this up and I have to share it, because I find this idea so absurdly BRILLIANT! I am a sucker for funny pictures of pets, and if those pets are featuring something that looks like Donald Trump hair, then it's straight up irresistible! I am going to try and "trump" our cat Boo, we will see how that goes. I'd love to see her site get some traffic and have some pics submitted to her - let's make this happen! 

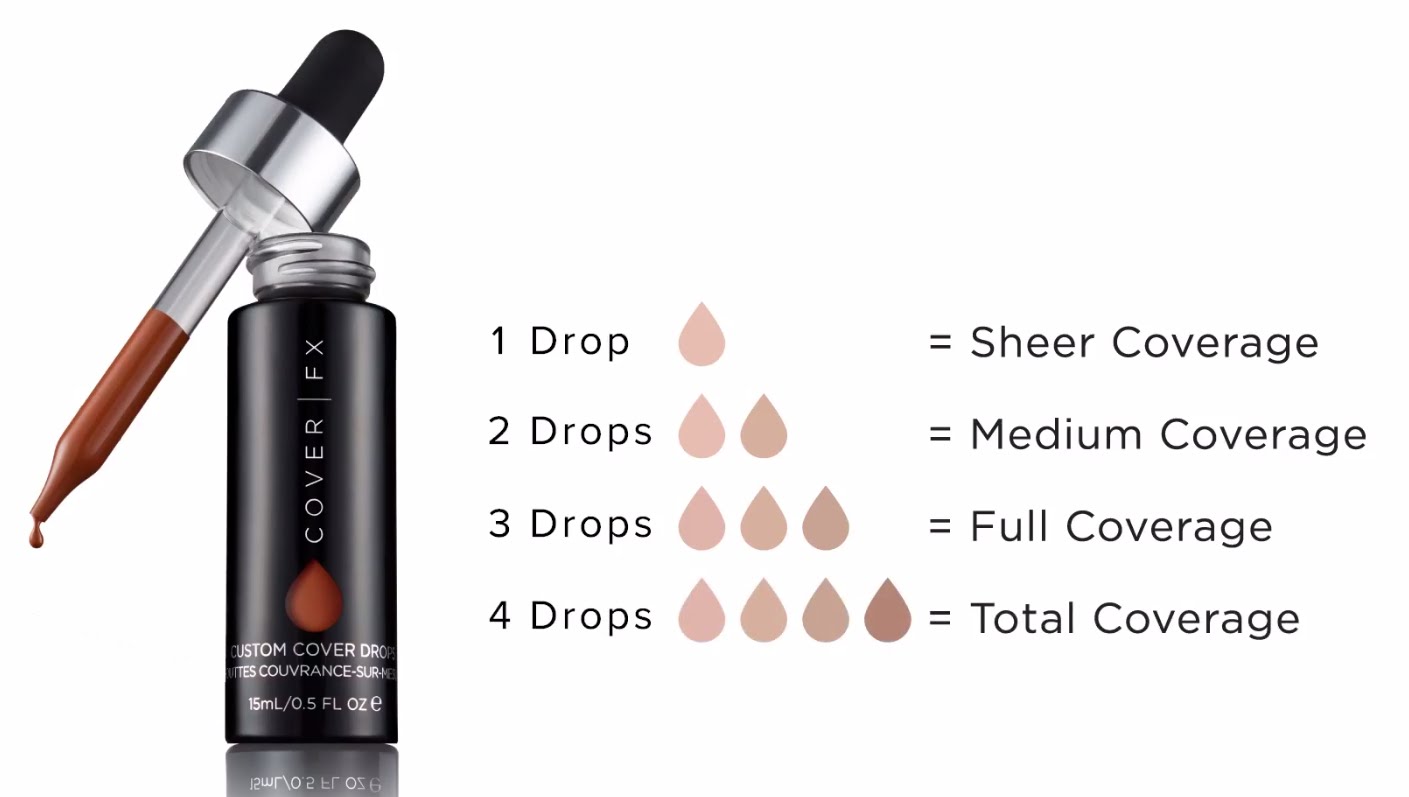
Makeup: Cover FX Custom Cover Drops


    This is a relatively new product that I have been using this month and I can not talk it up enough.  These drops are a pure pigment that you mix into a moisturizer or primer of your choice, essentially making a custom foundation mixed precisely for what your needs are.  There are a ton of shades available, and shades can be combined for even more variation.  I found myself typically using 2 drops mixed in with one pump of my primer (Kat Von D Lock-It Featherweight Primer).  The foundation wears really well and mixing it hasn't added any additional time to my routine.  Now instead of putting on primer and waiting for that to dry before applying foundation, I just do it all in one.   The only thing I am not a fan of, is the packaging is made of glass.  I know one of these days that is going to be shattered on our tile floor.

Fashion: Flannel Shirts


     OK can we just take a minute and discuss how awesome it is that there is a resurgence of all things 90s?  I could have done without the past two summers filled with 80s neon colors, neon orange is a color that should only be worn by traffic cones.  But flannel?  THAT is a trend I can get behind!

I'd love to hear some feedback on this type of post!  Is it something I should stay with doing once a month? Hopefully next time I can get some video!  I'd also love to hear what your picks are for the month of September, if there is something you think I should check out please tell me about it in the comments!

See you next week!!

Monday, September 14, 2015

DIY Wooden Pumpkin Sign


     Hi all!  We are in the midst of our CRAZY month of September.  My husband is currently in France on business. I'm home alone with the kids, keeping them alive, mostly happy (although the twins were really mad about the early bedtime I enacted last night), and trying to pack for my own trip to the city of lights.  Well not so much packing as whining about the limited selection of makeup I'm forced to bring, intermingled with panic attacks of flying solo across a massive body of water.

     So I needed something to keep my overactive mind occupied.  Time for a craft project!  And this little fall pumpkin sign has been perfect.  The steps are quick with quite a bit of downtime in between, so find a place to set it up where it can just stay put for a few days and tackle whenever you have a few minutes to yourself (nap times, right after bedtime, etc).


What You Will Need:


  • Scrap wood - various widths and heights (one piece per letter) - I used craft wood as our scrap pile is gone now that we've recently moved. 
  • Wood letters  
  • Wooden Leaves - I found these in the Autumn section of Hobby Lobby. 
  • 1 Dowel rod cut down into 4 pieces for "stems" 
  • Fine grit sandpaper
  • Wood Glue
  • Acrylic Paint 
  • Americana Decor Creme Wax - Deep Brown (optional)
  • Sawtooth picture hangers (not shown)


Step 1: Cut and Sand as Needed

     The two "l" pieces of wood I selected were originally the same length.  To add some variety I trimmed one of them down.  I also cut a dowel rod into 4 pieces for the stems.  I quickly ran a piece of sandpaper over all the edges to make sure they were smooth.  I also attempted to sand the wood letters as best as I could since the edges were pretty ragged. 


Step 2: Glue the Pumpkins Together


     Run a small line of wood glue along both edges of the "a" pumpkin and the left edge of the last "l" pumpkin.  I used a finger to thin and smooth the glue into a wider strip.  Layer the "a" pumpkin on top of  the "F" and the first "l" pumpkins.  Layer the left side of the final "l" pumpkin over the right edge of the first "l" pumpkin.  I tucked a paper towel under the right edge of the last pumpkin to keep it level while it dried.  Set the pumpkins aside and let them dry overnight. 


Step 3: Paint the Leaves and Letters


     While the glue on the pumpkins was drying, I painted the leaves and letters with acrylic paint. I didn't prime anything, and two coats of a standard craft acrylic paint was enough for full coverage. Set aside and let dry overnight. 


Step 4: Paint the Pumpkins


     Once the glue has fully dried, paint the pumpkins.  I used a 2" foam brush and two coats of a craft acrylic paint - the name of which was actually pumpkin!  I did not prime the wood, and the paint coats are a bit thin to let some of the wood grain texture show through.  Set aside to dry. 

Step 5 (optional): "Age" the Pumpkins


     The pumpkin orange paint I selected was a little bright for my taste, so I decided to darken it up by "aging" the sign using creme wax.  I used a old washcloth to liberally apply the creme wax over the entire painted surface, making sure I got wax in all the nooks and crannies of the pumpkins.  Then I used a clean portion of the washcloth to wipe off all the excess wax, wiping in strokes that went with the grain of the wood.  Wax that was deposited in the crevices of the wood will remain behind providing the darker, aged (dirty) look.  I continued to add wax until I was happy with the look, then set aside to dry. 


Here's a close-up view of how the wax settles in the wood grain to give a more aged look. 

Step 6: Glue the Letters, Leaves, & Stems 


     Again I used my finger to smooth the glue out over the backside of the leaves and letters.  Wipe away any excess with a paper towel.  The wood glue will not dry clear, but it can be painted. It's easiest to just wipe away than it is to paint it later though. Set aside to dry overnight. 


Step 7: Attatch the Sawtooth Picture Hangers

     Sorry I do not have a picture of this step as I still need to get some. But I can show you that they look like this:


They are easily found at any craft store or home improvement store (I usually find them sold for less at the home improvement locations).  I plan on attaching two, one to the back of the "F" pumpkin and another to the back of the first "l" pumpkin.  Use a ruler or a level to make sure that they are level with each other. 


Step 8: Hang Up & Do a Dance!

Seriously.  Another fun project for the house complete!  You are a domestic goddess (god) and should be treated as such :)


Tuesday, September 8, 2015

DIY: Festive Fall Wreath With Monogram


      In my opinion there is nothing more welcoming than a nice wreath on the front door.  This is true for all seasons, but in the fall there's something about the colors that just makes it more cozy and friendly.   Pre-made wreaths however can be pricey, especially if you want a full one with lots of fall foliage. Fortunately wreaths are easy to make - I promise even the most crafty-challenged person can take this on.  And with some ad watching, making a wreath can be ridiculously affordable.  Included below are the instructions to copy the look I have created above. 


What You'll Need:


1. 20" Grapevine wreath 
2. Wooden letter or saying
3. Acrylic paint - 1 tube 
4. Burlap ribbon - 1 Spool should be more than enough.
5. Twine
6. Mod Podge
7. Glitter
8. Scissors
9. Paint brushes
10. Floral stems - I used 4 leaves, 2 pumpkins and 4 "berries"


Step 1: Paint Your Monogram


     I used a foam brush for this to keep the brush strokes to a minimum as I was using a metallic gold paint. I also let it dry overnight. The paint I used is from DecoArt (I picked it up at Hobby Lobby) and is a paint that I already had at home and have used in many different crafts.  You could easily use spray paint on this if you were so inclined, I just wanted to keep costs to a minimum and use paint I already had. 

Step 2: Glitter Your Pumpkins


     Go insane, go insane! Throw some glitter make it rain!  OK I'm done singing Ke$ha (maybe). Anyway, if you wanted to make this easier on yourself you could buy the floral stems that had pumpkins with glitter already applied.  I wasn't fond of my color selection, these non-sparkly pumpkins were a pretty dark orange-red.  So I very lightly brushed some Mod Podge on the tops and dusted them with a fine-grit glitter.  Then set them aside to dry with the monogram. 


Step 3: Make a Bow


     I followed the directions from this lovely site: http://www.thistlewoodfarms.com/how-to-make-a-burlap-bow.  Bow making is not my strong suit. If I were to do this again, I might use some burlap that is a smaller width and maybe wired. Alas this is what I had hanging around the house, left over from another craft so I figured I would use it here.  Also since the burlap is kind of deconstructed I felt that the the lop-lopsidedness wouldn't be too obvious. 

Step 4: Attach the Bow to the Wreath


     Figure out the general layout of the wreath and place the bow first.  This will be the anchor element of the wreath and all the other pieces will fan out from this central point.   I used a piece of twine to tie the ribbon to the wreath, but you could also use wire or even a hot glue gun.  The twine ties in nicely with the burlap and again it was something I had on hand.


A backside view of the attached bow.  I used a simple knot. 

Step 5:  Add in Pumpkins and Start Filling


     The HARDEST part of this project was figuring out where I was going to put the pumpkins.  Originally I thought the bow would be more in line with the wreath, and I was planning on doing pumpkins on top and bottom in a more symmetrical pattern.  I quickly realized that A: that looked really odd with only two pumpkins and B: my bow didn't want to lay straight.  So instead I let the bow sit however it wanted to and decided to do a more asymmetrical look.  I put the pumpkins on the top and the majority of the leaves on the bottom.  


     The great thing about the grapevine wreaths is that by their nature they catch on to everything.  For this step I just had to shove the floral stem wires deep into the vines and they stayed put. I shook the wreath around a bit to make sure they wouldn't fall out, which they did not.  If yours do you can secure them with some floral wire, twine, or even some glue from a hot glue gun. 

Step 6: Attach Your Monogram 


     I wanted our "N" to be in the middle of the wreath so I threaded some twine through the vines and tied each end to the letter.  If you wanted to you could use the twine (or any of the above mentioned methods) to attach it directly to the wreath.  

Step 7: Hang It Up: Bask in the Revelation That You Are a Crafting Genius. 


     This is the most important step - especially the second part.  When someone compliments your wreath (and they will) say "Thanks I made it myself!"  They will think you are amazing.  When your husband comes home and complains that you have spent more money on house decor - whip out the receipt and show him the savings - make sure to show him the prices of a pre-made wreath first! 


The Bottom Line:  How Much Did this REALLY Cost?

   These are the prices of the materials I did NOT have on hand, and had to buy.  I purchased everything from Hobby Lobby when it was 50% off.  If something you want isn't on sale at Hobby Lobby, wait a week.  Chances are next week it will be as they rotate departments every week. 

Grapevine wreath - $3.50
Wooden Letter - $1.75
Floral Stems "leaves" - $3.00 (4 at $0.75)
Pumpkin Stems - $1.50 (2 at $0.75)
Floral Stems "berries" - $4.00 (4 at $1.00)

TOTAL = $13.75

   I was able to save some by using materials I already had at home, the burlap ribbon, the glitter and the paint.  However all these materials are relatively cheap and can also be found at 50% off.  The most expensive item if you had to buy everything would probably be the Mod Podge and I think that can run around $11.00 at full price. 


Tuesday, September 1, 2015

5 Reasons to Put ColourPop in Your Life


Have you heard of ColourPop? Chances are that you have not. Unless you live part of your life on beauty blogs and YouTube like I do (hey I have to actually do something when I'm hiding in the bathroom from my kids).  Only available at www.ColourPop.com, this brand is a relative newbie on the beauty scene, but what an impression it is making. Below I have assembled the top 5 reasons why I feel you should check out this brand and some swatches to show you some of the products.

1. It's Cheap

Not in the "I found this in the clearance bin. It doesn't quite match but I'm gonna make it work because it was only 50 cents" kind of way.  But rather in the "I can buy a decent amount of this and still afford my car payment" kind of way.  A single eye shadow or lippy (lipstick), or lip pencil  will set you back $5.00, a blush or highlighter will cost you $8.00.  That's right at, or just below what I usually pay for drugstore brand makeup (L'Oreal, Maybelline, etc).  Plus when you first shop at the site, they give you a $5.00 gift code for signing up for the newsletter.  Hello free product! The cost is even more impressive when you consider the next two reasons...

2. The Formula is Good

Really good. The pigmentation is superior to most drugstore brands, and the products wear evenly with minimal creasing or fading.  The lipsticks (especially the mattes) are a smooth but heavier formula for longer lasting wear. I found them to be a little bit on the dry side if worn alone, but paired with a lip balm or gloss they were perfectly comfortable.  The formula for the shadows and blushes are what is truly unique.  When touched they feel like a cream or gel, but when applied they blend like a powder.  The result is a product that requires less building up of layers to achieve a saturated color, while also being blendable enough that even the most mistake prone (raises hand) can apply worry free.  Because of this unique consistency I found it best to apply first with my fingers, then blend out with a brush or sponge.  It may seem awkward at first, but again mistakes are easily blended away.

3.  Made in the U.S.A.

That's right, in our very own country.  They are also cruelty-free. Admittedly I am not the most discerning person when it comes to the location of cosmetic manufacturers.  I usually make decisions based on how a product works for me, not where it was manufactured.  But given the option to purchase products I like AND help support jobs here in America all while keeping the animals out of the latest lip trends...well that just gives me the warm fuzzy feelings.

4. Fun Color Selection

Have you been looking for a lime green shadow?  How about a deep purple lippy?  If your answer is yes, then ColourPop is for you.  The colors range from tame neutrals to extreme neon with a good selection of finishes as well.  Given the relatively small cost, this brand is a great source to tap into when wanting to try out a new trending look without breaking the bank.

5. They Appreciate Their Customers

In the delivery of each and every order I've made I have received a hand written thank you card with a fun little saying.  I still remember my very first order's card said "You are a beautiful cupcake in a world full of muffins." Cheesy? Yes.  Did it work? Oh hell yes!  Gone are the days where a company actually makes you feel like you did them a solid for shopping with them.  More and more often I don't even get a packing slip, much less one that had a computer write out a generic "thanks for your order". So to get an actual hand written thank you? That demonstrates to me that they take that extra step to show how much they appreciate their customers, and that is something that will win me over time and time again.


Ok do I have you convinced yet?  How about I show you some of my personal favorites from their collection.

Eye Shadows 


Acorn: A cool-toned light beige with a pearlized finish.


Bill: Muted plum-beige in a matte finish.  This is my all time favorite transition color for my crease.


Cricket: Metallic finish mid-tone plum with glitter.  


Doe-A-Deer: A deep almost black violet color in a matte finish.  I love this for smoky looks.


Downtown: Cool-tone deep taupe color in a matte finish.


Fairfax: Matte finish deep brown.  I love this as a liner and to smudge out my lower lash line. 


Girl Crush:  A mid-tone gray color in a matte finish.  Another neutral color (seeing a trend?)


I Heart This:  Taupe with multi-color glitter.  Don't let the glitter scare you, in this shade it's a muted  
                       sparkle and very pretty on the lid.  Also I dropped the container, hence it being broken.


La La:  Described as a a rose gold with an ultra metallic finish, I find that this comes off more  
             coppery on my skin tone.  Still a beautiful color for warm summer looks. 


Mittens: A deep warm brown in a matte finish.  Great color to deepen a warm look with.  


Liberty:  A true silver in the ultra-metallic finish.  This is literally like liquid tin-foil on your eyes.  
               The picture does it no justice.


Bubbly: Candy pink color with silver and pink glitter. Admittedly I don't wear this one much, it is 
              very pretty, just not my color. 


Lippie Stix 


Cookie: Nude beige in a matte finish. 


Corset: A pink lavender color in the hyper-glossy finish.  I loved this color this past summer. 


Lumiere:  My favorite lippie so far!  It's a dusty mauve pink and I can only describe it as a nude pink                  with a little something extra.  It's in the matte finish and lasts a good while on my lips. 


Westie: Dusty baby pink in a matte finish. 


Tootsie: A matte greige (gray beige) color.  I bought this at the beginning of summer and have not 
              used it much.  I think it's better suited for fall. 


Cheeks


Between The Sheets: Mid-toned beige pink in a matte finish.  A good neutral color for adding just a                                      bit of warmth to your cheeks.  


Trickery:  Don't let the bright orange color fool you.  This is actually a pastel peach color with a satin                  finish (the finish doesn't show well in the photo).  This was my first attempt at coral colors                  on my cheeks, and I was really happy with the results (not clownish at all).


Smokin' Whistles:  This is a highlighter in a cool-toned pink champagne.  As someone with aging                                       skin I am super picky about my highlighters.  I love this one.   It is very finely                                       milled with no chunky glitter. It's really a nice color for the fair skinned ladies.  


Disclaimer:  All products featured were purchased by myself and opinions on products are my own.  This post is in no way sponsored, paid for or influenced by ColourPop. 

Twitter Delicious Facebook Digg Stumbleupon Favorites More