Friday, February 19, 2016

The Pintertest Files: Brownie in a Mug


      Hello all and welcome to a VERY late Pintertest File!  Brought to you by Mediacom (#notsponsered) who decided to do "maintenance" this week resulting in us not having a reliable Internet connection for a good chunk of the week!  Thanks!

     If you live pretty much anywhere in the Midwest like I do, you have recently been experiencing some seriously crappy cold weather.  Now I like myself a good winter, but when it gets to be February I am pretty much over it.  Luckily for me that is just about when Iowa weather decides to take a turn for the worst and get really cold.

     So being that I didn't want to leave my house at all this past week.  I had to come up with a Pintertest that could be tested with objects/ingredients that we already had.  Throw in every one's love for a tasty baked good and we have this month's file: the brownie in a mug.

     Pinterest is FILLED with these single serve baked delights, brownie in a mug, cake in a jar, cookie in a cup, 4 course steak dinner in a mason jug... if you haven't seen a post for one of these, you haven't been browsing Pinterest.   But the question that has always lingered on my mind is... do they actually taste good?  Tonight we found out.

What You Will Need:


  • 2 tablespoons of lightly flavored oil (don't break out the extra virgin olive for this)
  • 1/4 cup all-purpose flour 
  • 2 tablespoons cocoa powder
  • 1/4 cup brown sugar
  • 1 1/2 tablespoons water 
  • 1/2 teaspoon vanilla extract 
  • 1 large egg
  • Pinch of salt (optional)
  • Mixing Bowls
  • Measuring Cups
  • Microwave

Step 1:  Sift the Dry Ingredients Together


     In a mixing bowl sift together the cocoa powder and the flour.  Cocoa powder usually has some clumps so sifting is preferred but not absolutely necessary. 

Step 2:  Whisk the "Wet" Ingredients Together


      In a separate mixing bowl whisk together the egg, oil, brown sugar, water, vanilla, and the salt (if used). 


Step 3:  Whisk Ingredients Together and Pour into Mug


     Whisk the wet ingredients into the dry ingredients until combined.   Pour into desired mug.  I read in multiple sources that a tall skinny mug works best at reducing the chances of the mix rising over the top of the mug while cooking.  Since scraping burnt chocolate off microwave floors is just not my scene, I went with that. Whatever you use, just make sure the mug is microwave safe and can hold 12 ounces. 


Step 4: Microwave


     Clean up any drips around the edges of the mug, then place in the microwave for 1 minute and 45 seconds.  You may need more or less time depending on the power of your microwave and the mug being used.  Our microwave is an old 950 Watts microwave with a broken turn table.  So less time may need to be used in a newer model. 

Step 5: Serve 


      CAUTION: the brownie will be extremely hot!  Also this makes a very good sized brownie, it can definitely serve more than one person.  I took it out of the mug and cut it up in thirds to serve, and it was still a satisfying amount of brownie, especially when served with ice cream.


Final Grade and Thoughts:


     This tasted pretty damn good.  It wasn't a dense fudge-y brownie, it had more of a spongy cake-like texture.  But it was tasty and definitely would fill a craving.   The recipe was quick and easy enough, although for a "single serving" treat it did produce a lot of dishes (separate mixing bowls).  It leaves me wondering how this would turn out if one were to try and stir all the ingredients together directly in the mug.  Overall I would recommend this to anyone who would like to indulge in a sweet treat without having a pan of left over brownies tempting them the rest of the week. 


Tuesday, February 9, 2016

January Favorites!


     Hello!  Welcome to the first favorites post of 2016!  It's going to be a bit on the short side as I have not been too adventurous with new products, or I just haven't liked them. Take your pick.  Most cosmetic products I have recently been fond of were discussed in my 2015 Favorites post (here), but there are a few things I wanted to share with you guys - so let's get started!


Books:  God of the Dead (Seasons of Blood #1) by Elias Anderson

God of the Dead by Elias Anderson available at Amazon.com
     This month I am playing around with a free trial of Kindle Unlimited, a subscription service that grants you access to tons of book titles through my Kindle app.   This was a book recommended to me based on my previous purchases.  I didn't know anything about the author or the series (it's apparently a prequel to a trilogy) and since it was free I thought "why not."

     I don't quite know how to place the genre.  It's definitely horror,  but there is a very interesting mix of crime drama as well.  The book was well written, the scenes were very descriptive (if you don't like a bit of gore don't bother).  It was an extremely fast read.  The book is 244 pages and I think it only took me an hour or two to finish off.  I did find myself wishing there was more to the story when I was finished.  It wasn't an unsatisfactory ending per se, but the book moved quicker than I would have liked.  That being said it is classified as a prequel and after reading this book I will certainly be looking into the next three titles to see if they are similar in quality.


TV/Movies:  Jessica Jones Season 1

Jessica Jones Season 1 available through Netflix 
     Based on the Marvel super heroine of the same name, this Netflix series has quickly become one of my favorite comic book adaptations of all time.  Yes, I said it.  It may even be better than Batman (ok maybe not, but at least tied with the Dark Knight).

    "Why?" you may ask, "What makes this series so good?"  Well, first off all this seasons main villain is probably one of the scariest villains of all time, Kilgrave.  A man whose ability allows him to control the minds of others, leading them to do his evil bidding by making them believe it's what they want as well.  The series is amazing at not only explaining  Kilgrave's mentality that he has done nothing wrong (it wasn't him that killed after all), but also the mental deterioration that a person endures after Kilgrave has forced them to do something against their nature. 

    In addition to the villain, the series depiction of Jessica Jones is also exceptional.  She is not what one would call a typical super hero, most of the season she is actively avoiding being labeled "the good guy."   There are even  points in the series where you find yourself almost rooting against her.   Of course her history and experience with the antagonist explains her actions, but it is this internal character struggle that makes the series stand out from the countless other super hero series currently being aired. 

Music:  January Mixed Tape

 January's mixed tape on audio cassette no longer available

    So this month was kind of a hodge podge of music.  There wasn't really any rhyme or reason to what I listened to.. on any given day I didn't even stay within a genre, so this month really is a mix!  

  1. Disturbed -  The Sound of Silence - this cover completely blew me away when I first heard it on the radio a week or two ago. 
  2. Rise Against - The Good Left Undone 
  3. Sia - Elastic Heart - I don't care what people say about the video, if you look up the story behind it, it's brilliant. 
  4. Led Zepplin - Stairway to Heaven 
  5. Elton John - Goodbye Yellow Brick Road 
  6. Eminem feat. Rihanna  - Love The Way You Lie
  7. Stone Sour feat. Lzzy Hale - Gimme Shelter - another fantastic cover 
  8. Bring Me the Horizon - Throne
  9. Elton John - Believe 
  10. Five Finger Death Punch - Wrong Side of Heaven 


Makeup: L'Oreal Infalliable 24 Hour Eye Shadow 

L'Oreal Infalliable 24 Hour Eye Shadows available at most discount and drug stores 

     This isn't a new product to me, I've actually had these for quite a while.  I don't know why I have overlooked or neglected them for so long.  They have a fantastic formula.  I don't know if they last 24 hours or not. I don't believe I have ever had an occasion where it was necessary for me to wear eyeshadow for 24 hours.  But the shadows do last a while with out creasing or fading. 

    In particular if you are looking for a bright cool toned purple, check out Perpetual Purple or Purple Priority.  You may have to look in some various locations, while they are available at most discount and drug stores, each chain has its own exclusive colors. Unfortunately I don't remember which chain of stores carried the purple colors.  But the purples are some of the best purple shadows available. I'm not kidding.  

    A downside to these is that they can be a little bit tricky to work with, only because they are actually loose pigments that are pressed down into the jar.  So its this odd mixture of a pressed shadow and a loose pigment.  I have found that a finger or a cheap sponge applicator works best for getting the pigment on your lid then you can blend with a brush.   


     That is all I have folks!  If there is something you think I should try out, or if you disagree with any of my choices feel free to comment below!  I'd love to hear from you.  As always thank you for stopping by and I will see you next week! 

Wednesday, January 27, 2016

January 2016 Ipsy vs. Boxycharm


     Well hello fellow beauties!  If you are like me then you too have probably had enough of your own chaos this month (what is with January? it's a magnet for chaos).  So lets lighten things up and talk about what we got in this month's Ipsy bags and Boxycharm boxes.

     Again to quickly give the rundown on how these work.  Ipsy is a $10 a month subscription service.  Each month you are sent a small cosmetic bag filled with various beauty products based on a questionnaire you fill out.  Usually products are sample sizes and are from both drugstore and high end brands.

     Boxycharm is a more expensive subscription service at $21 a month.  It almost exclusively contains high end products and the majority of the time they are full sized. I pay for both of these subscriptions myself and the reviews of the products included are my own.  You know the drill.


Ipsy:

January 2016 Ipsy Bag 'All Eyes on You'
     'All Eyes on You' is the theme for this month's Ipsy bag.  It comes in a very brightly colored bag that is kind of Andy Warhol-ish.  The description says "Keep your eyes on the Prize!  From must-have products to prettify your peepers - like the Balm's cult-fave eyeliner - to on-the-go beauty essentials. January is all about a seriously standout look."


Coastal Scents Pearl Shadow Angle Brush:

Large Pearl Shadow Angle Brush by Coastal Scents
     I have tried a few of the Coastal Scents eye shadow palettes, and have mixed feelings regarding them.  So when I saw that I got a brush in this Ipsy bag I was skeptical regarding it's quality.  But I am happy to report that this brush is of a very nice quality.  The ferrule and handle are both very sturdy and tight.  The bristles are very soft and I haven't experienced any shedding.  The shape of this brush is a little awkward as it is very large, best used to apply a shadow across my entire lid which I don't often do.  But that's more just personal preference, not anything particularly bad in how this brush was constructed. 

   Also as a bonus there is a 25% off code that can be used.  I think it's for any purchase at CoastalScents.com the code is Pearl25Off, and of course I like to share those codes with any readers in case they would like to try the products out for themselves.   The code does expire on March 7 of 2016 so it is good for another month or so. 


Skyn Iceland Glacial Cleansing Cloths

Skyn Iceland Glacial Cleansing Cloths
     Admittedly I have abandoned the use of cleansing cloths as they tend to dry my skin out, so these did not appeal to me the way they might to someone else.  I have used these to clean my hands/arms when swatching products. So my impression is based of that type of use. 

    These wipes are different in that there is a lot more product loaded on these cloths than the traditional makeup removing cloths.  Reading the instructions one is supposed to rub two ends together to create a foamy lather, then use the cloth on the skin.  It definitely lathers up and takes off makeup well.  However you are not supposed to rinse the lather off, just leave it on to dry.  I didn't mind doing that with my hands, but I don't think I would like doing that with my face. 

     Also the fragrance with this is very strong.  It's not unappealing. Just very strong.  So while it says it's been formulated for people with sensitive skin, the strong fragrance makes me wonder how it would actually affect my skin.   For now I'm sticking with using them on swatches. 


City Color Eyeshadow Trio - Falling Leaves

City Color Eyeshadow Trio in Falling Leaves
     This is a nice trio of eye shadows from City Color.  The formula was very nice, not quite creamy but smooth with very little powder being kicked up with I dipped my brush into the pan. The colors did apply a little sheer, but they can be built up quite nicely and a base or primer helps tremendously.
 
Close up of Falling Leaves  Eyeshadow Trio by City Color 
     I'm actually quite happy to get this in my Ipsy bag.  It is some shades I would never have picked out for myself.  While it may not be my most favorite shades on myself, I like that receiving this has forced me to try something a little out of my comfort zone. 

City Color Eyeshadow Trio in Falling Leaves Swatch

the Balm Mr. Write (Now) - Jac

the Balm Mr. Write (Now) in Jac
     Another color that I would probably have not picked out for myself.  This is a deep gold almost bronze eye liner.   The formula of this is fantastic.  It applies easily without tugging, and once it is set it does not budge.  I have yet to try it in my waterline, but I am impressed with what I have seen so far.  I may look into other colors that are more my style. 

the Balm Mr. Write (Now) in Jac swatch

Lasting Smiles Organic Lip Balm - Peppermint Creme 

Lasting Smiles Organic Lip Balm in Peppermint Creme
     I have nothing bad to say about this lip balm.  It made my lips feel soft and hydrated. When first applied it is a bit shiny but nothing too bad.  The hydrating feeling lasts for quite a while, I didn't feel like I needed to constantly re-apply, even through eating and drinking. The flavor is light and fades fairly quickly but is pleasant while it's around. 

   In addition to being a nice balm, it is organic and the proceeds help fund surgeries that fix cleft lips and palates in children around the world. 


Boxycharm:

January 2016 Boxycharm 'Eyes on 2016'

     January's Boxycharm was also focused on eyes with it's theme being 'Eyes on 2016'.  


Royal & Langnickel Revolution Brush Set - Full Size - $23.97

   
Royal & Langnickel Revolution Brush Set 
     The first product is an eye brush set from Royal & Langnickel.  Included in the set is the BX-90 which a pointed crease brush. The BX-80 which is a typical flat shade brush for packing shadow on the lid.  And finally the BX-95 which is a pointed detail brush for smudging and contouring.

    So these are supposed to be revolutionary in their design.  They have a special "textured fiber" bristle (all brushes are of synthetic materials) that is supposed to act more like a natural hair bristle but without the fragility of natural hair.

     As far as performance goes, I don't know if I see a huge difference in how they lay down product. I need to try these out with my ColourPop shadows as usually I prefer to use a synthetic bristle for those to avoid the brush absorbing too much product.  I can say that I am not super fond of the BX-90 the crease brush.  The bristles are long like my other crease brushes, but this brush is very stiff.  It feels like an odd hybrid between a traditional crease brush and a smudging brush.  It's just different, and I'm finding it difficult to get a blown out, well blended crease with this brush.  If you have any suggestions or ideas on how this brush should be used PLEASE tell me so in the comments!  I'd love to know if I am using this wrong.

Note that each brush is also available individually for $7.99

Blinc Mascara Amplified - Full Size - $26.00

Blinc Mascara Amplified in black
     I wont lie, this product kind of scares me.  It is what they call a 'tubing' mascara, where the product actually forms a tube around the individual lash to provide length and volume.  According to the manufacturer this type of mascara is run proof, smudge proof, wont clump or flake, it is rub proof, waterproof and you can run a marathon in it.  Umm... yeah.  You are also NOT to use makeup remover to remove this mascara.  Simply LOTS of warm water and gentle pressure from your fingers or wash cloth.

      The directions are equally as interesting, you are not to use any moisturizers on your face before using this product as the oils in the moisturizer may interfere with how this product works.  Again it stresses lots of water and pressure should be used to remove the tubes.  You will "feel" the mascara coming lose and there is a note that says you will see the tubes in your sink or hands and they will look like your lashes, but they are just the tubes.

      OK I am intrigued and scared.. but mostly intrigued.. OK maybe mostly scared?  I try to stay far away from any mascara that uses fibers to lengthen.  Mostly because I do have super sensitive eyes and the thought of little fibers accidentally getting into my eyes sounds about as nice as getting a foot rub from a porcupine.   But this doesn't appear to be fibers, they compare it to making a cast around the lash.

     We will see....I'll update you if I do end up trying this out.


Starlooks Pro Luxe Longwear Eyeliner - Full Size - $19.00

Starlooks Pro Luxe Longwear Eyeliner Pen in Black
     Yay a product that I know how to use!  LOL Really though this is just your typical felt tip eye liner pen.  The black color is very dark and intense.  It does have a bit of a shine to it dried down, so if you like a more matte look for your liner this probably won't be the formula for you.

Swatch of Starlooks Pro Luxe Longwear Eyeliner Pen
     Aside from the bit of shine that I am not crazy about. The formula is very nice.  It doesn't settle into my fine lines and it dries down fairly quickly and it stays put. It doesn't appear to be waterproof, but it's not claiming to be either.  It removed very easily with makeup remover.  I was able to create both fine lines and thicker lines with the pen.  It's not anything revolutionary, but it is a good basic liner. 


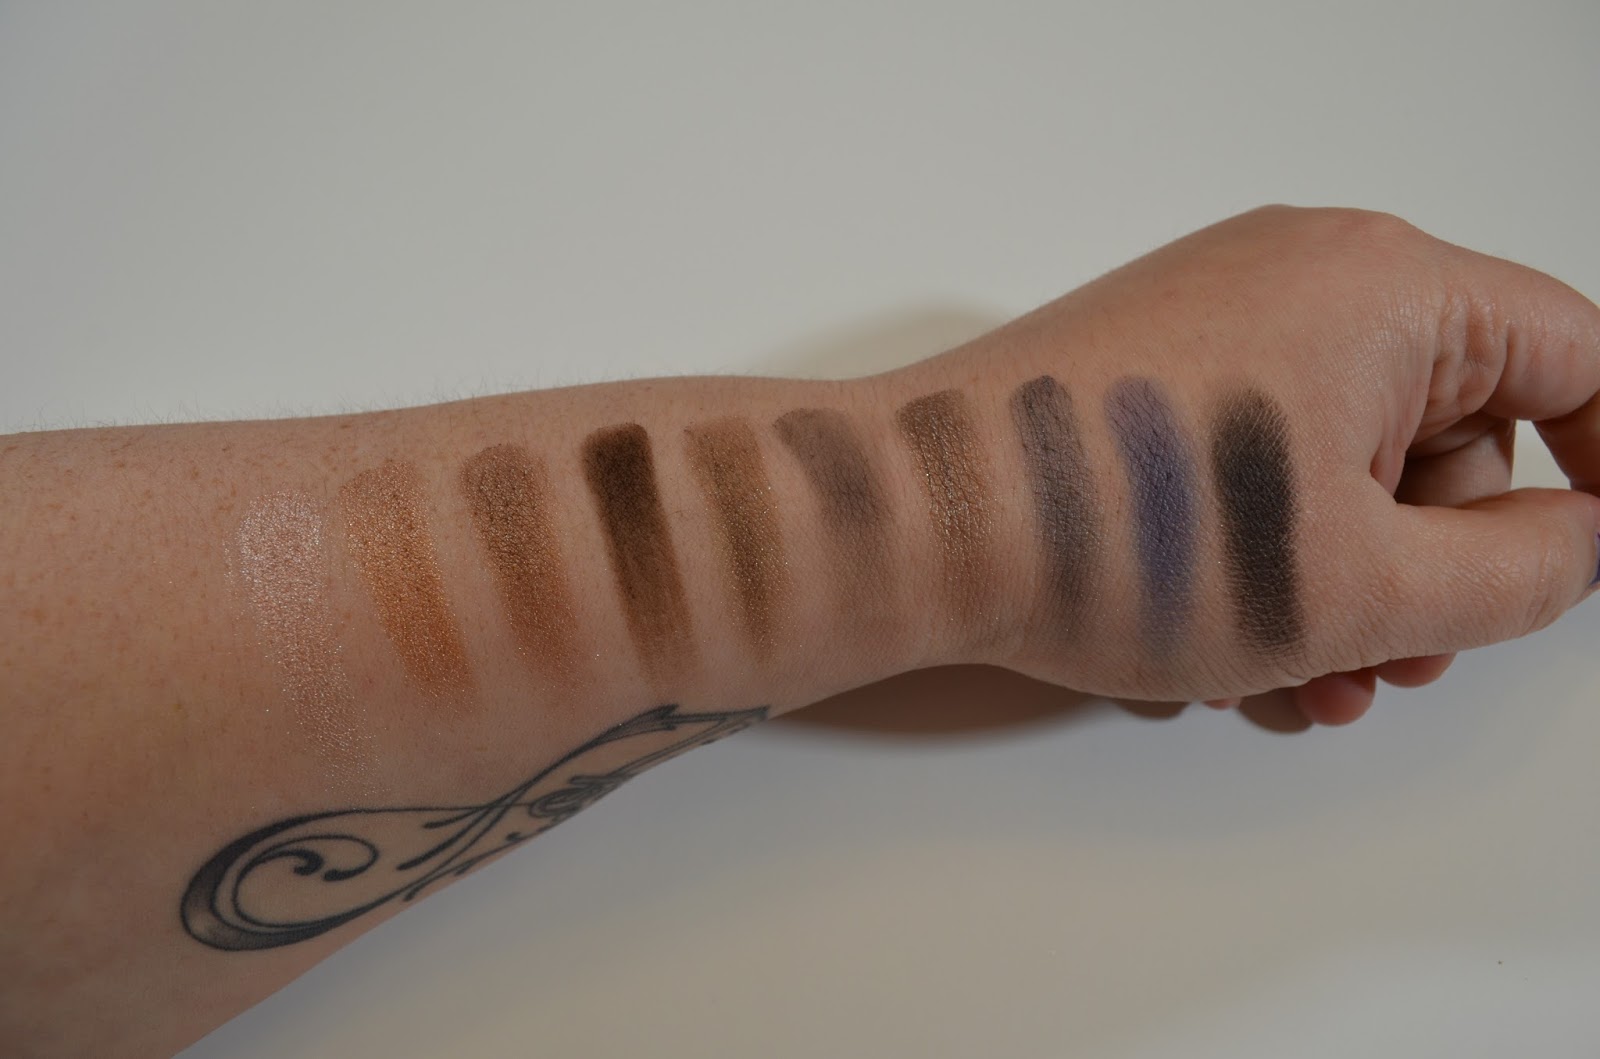
Coastal Scents Revealed Smoky Palette - Full Sized - $39.95

Coastal Scents Revealed Smoky Palette Packaging 
     OK first off I feel the need to mention that while Coastal Scents does list the original price of this palette as $39.95, never have I ever seen it actually sold for that price. The list price on the website says $29.95 and even then I have never seen it sold for more than $19.95.  I don't know where $39.95 is coming from, but that's not the cost of this palette. 

View of all 20 shadow pans in Coastal Scents Revealed Smokey Palette
     For those unfamiliar with Coastal Scents, it is a discount cosmetic company.  They are well known for having the giant 88 pan palettes that they sell for like $15.00.  The eye shadows in those remind me a lot of the cheap off brand makeup kits that you can buy around the holidays.  You know the ones that have like 80 eye shadows, 15 blushes and 10 lipsticks all in a glitter train case. 

Top row swatch of Coastal Scents Revealed Smoky Palette
     Anyway the most recent products Coastal Scents has put out are their own takes on the Urban Decay Naked palettes.  I have received those in previous Boxycharm boxes and they are.. meh.. they are OK for cheap palettes. Owning the original Naked palettes, there is really no appeal for me in the Coastal Scents versions BUT I will say if money is an issue for you, the Coastal Scents Revealed palettes are a decent enough alternative to Urban Decay.  You can make them work. 

Bottom row swatch of Coastal Scents Revealed Smoky Palette
     So this Revealed Smoky palette is obviously a play on the Urban Decay Smoky palette. And I will say that of all the Revealed palettes, I like this one the most.  It also has some very close color dupes to the Urban Decay Smoky palette.  Does it behave the same as the Urban Decay? No. They take a little more work to blend out and to build up.  Some of the shadows are a bit chalky.  But again we are talking about a $20 palette compared to a $50 palette.

     The top row of shadows probably has the most misses for me. The first two mattes are pretty chalky and the bright gold color was really sheer.  The bottom row of this palette I was very surprised by.  Many of the colors are very nice, I really like the first 4 shades.  Again they aren't as easy to work with as the Urban Decay.  But for a $20 palette, these really are not that bad. 


     That is everything I received this month.  Thank you so much for stopping by!  If you have any experience with these products (especially the brushes and the mascara) , I'd love to hear about it!   Also if you would like to share what you got in your own Ipsy or Boxycharm boxes - feel free to share in the comment section.  I will see you next week! 

Thursday, January 21, 2016

Personal Update: Our Son's Diagnosis


     Hello everyone!  I would like to take a moment and preface this post by first thanking each and every one of you that support me by taking the time to stop by and read my blog.   A Beauty in the Chaos has grown exponentially in readership this past month and I am unbelievably thankful.  Today's post is going to be a little different than my traditional fare.  It is a subject that is incredibly difficult to write or to even speak about, so please bear with me.

     This past Tuesday I had to face a neurologist who looked me in the eyes and told me my child has Spastic Monoplegia Cerebral Palsy.  For my husband and myself, the diagnosis was not a shock.  Our son has been in physical therapy since he came home from the NICU and all signs pointed to some form of Cerebral Palsy.  This was essentially a formality.  Formal documentation of what we had known (feared) all along.

     One would think having some foresight would help ease the news of the diagnosis.  In a way it does.  I can't imagine having this news dropped on me completely unexpectedly.  But, in a different way hearing the confirmation was harder.

     See despite my tendencies to always prepare for the worst outcomes possible, I am at heart an optimist.  These past two years, I have never lost hope that perhaps my son would grow out of the troubles he was experiencing.  That it was for (lack of better definition) just a delay in physical development due to being born 3 months early, a delay he would eventually catch up with. That eventually the physical therapy he gets twice a week, the extra doctors appointments, the shoe inserts, the braces, all of that would be outgrown and left behind.

     When the neurologist said the words Cerebral Palsy, she didn't cast some sort of bleak future for my son (he's in the highest functioning group and his prognosis is good).  And logically I know that ultimately very little has changed for my son, his life continues as it always has.  He will still have a fulfilling future, his path is just a little different now. Yet emotionally I am a wreck.  Because with those two words, that tiny piece of hope died in me.  My son won't outgrow this.  There is brain damage, it is permanent. It's hard to remain optimistic about the future when so often life hacks away at our slivers of hope.

     We as parents try so hard to shelter our children (especially young ones) from the harsh cruelties that life can hand out.   We dread the day when we might have to wipe tears from our son or daughter's face because they were teased at school.  I am terrified of what my son may face due to his apparent difference.  I'm no longer tasked only with raising a strong, compassionate, and confident child, but also finding a way to be strong and confident myself regarding his condition.  To keep my composure when someone makes an offhanded remark regarding his walking or appearance, when what I really want to do is lash out at them about their ignorance.  Because that's what I want my son to learn.  Not just how to deal physically with his condition, but how to deal emotionally with the bullshit he may encounter.

     Again I would like to thank each of you who takes the time to check in here.  Much of this blog is essentially a type of therapy for me as well as a hobby.  Yes, it gives me a forum to express my feelings and thoughts when stuff is bringing me down. But more importantly it provides a space where I can focus on the people and things that make me happy.  Even if it is something as trivial as a new eye shadow palette. Focusing on what makes us happy is sometimes the only way we can combat the chaos that life hands us.

Love and thanks to everyone reading this.  Thank you so much for supporting me an this blog.  I will return next week (if not sooner)!


Tuesday, January 12, 2016

The Pintertest Files: DIY Glitter Slime


    Hello everyone and welcome to the Pintertest Files!  Where I take a popular Pinterest post, test it out, and report back if it worked as promised, how easy it was, and if it is worth trying out yourself.

     January is always a tough month to get through, at least here in Iowa.  The big holidays have passed, there isn't any more vacation time to look forward to, and it is frigid outside  (today's high was 0).  All this adds up to some seriously stir crazy kids that make you realize bears have the right idea when they just hibernate on until spring.

     It's with this desperation for child entertainment that I chose DIY Glitter Slime as our next Pintertest.  The easy 3 item recipe that is posted on every mom blog the Internet wide, promising a colorful sensory playtime favorite that is not only easy to clean up, but impossible to mess up.

     A very special thank you needs to be sent out to my talented helper Gabriel who enthusiastically helped me test out this project and even offered some insight (see below).  Also to my husband who helped take photos when things got a little sticky.


What You Will Need:

Items needed to create slime all available at Wal-Mart 
  • Liquid Starch (I could only find at Wal-Mart)
  • Clear washable glue (with or without sparkles, it doesn't matter)
  • Water
  • Glitter 
  • Measuring Cup
  • Mixing Bowls
  • Spoons or stick to stir with
     All materials are fairly easy to find, save for the liquid starch. I could only find that at Wal-Mart.  Not really an issue except that I had looked in two other stores first before heading there. 

Step 1:  Mix Water and Glue

For glue solution mix 1 container of Elmer's clear washable glue with 1/2 cup warm water

     Measure out 1/2 cup of water, place it in the mixing bowl.  To the water add a full container of the clear washable glue.  Mix until the solution is consistent and clear. 


Fully mixed solution will be clear and slightly thinner than the normal glue texture

Step 2: Slowly Add Liquid Starch to Glue Solution

You will need 1/2 cup of liquid starch, add it to the glue solution bit by bit for easier mixing

     Measure out 1/2 cup of liquid starch. Bit by bit, add the liquid starch to the glue solution and start mixing like you have never mixed before. 


As soon as the liquid starch is added, gel slime starts forming. 


Step 3:  Mix Until Your Arm Falls Off


Solution is fairly easy to mix at first

      Sore yet?  Keep mixing.  The mixture is going to be the delightful texture of baby snot. Pretty soon it will be impossible to stir with the spoon which is when you are ready for the next step...


As more slime develops it becomes increasingly more difficult to stir with a spoon

Step 4:  Ditch the Spoon and Start Mixing With Your Hands


At first the slime is VERY wet and difficult to hold

     I should mention that at the exact point you grab the full blob of mucous-y goodness and start kneading it, it is going to stick absolutely everywhere all over your hands.  You will doubt the ratio of ingredients, you will doubt that this will work.  Hell you will doubt your reasoning skills to involve your 5 year old in this hot mess of a project.  Keep kneading and mixing.  It gets better. 


With continued kneading it gels up but remains very sticky

Keep kneading, eventually it will solidify more and stick to hands less and less

Step 5: Mix in Glitter


I added glitter by piling it in the middle then folding over to create a pocket, no loose glitter touched hands or work surface

     If you followed step 4 unabashedly like I suggested, you now have a clear-ish slime that doesn't stick to your hands or hard surfaces.  Now is the time to add in glitter.  I found the cleanest way to do this was to flatten out the slime, add a heap of glitter in the center and fold the slime over on itself to entrap the glitter in a pocket.  Then simply knead and work the slime until the glitter is evenly distributed throughout.  


Create unique color combinations by mixing glitter 

    I should mention that I divided the slime mixture out into 4 individual colors.  Gabe decided to mix one giant batch.  The only difference is the amount of glitter required to get the full color effect.  If the intensity of the glitter isn't to your liking you can certainly add more.  You can mix colors to obtain a galaxy or rainbow like effect.  It's really up to you.  


Finished product - All 4 of these colors were made with one divided batch of slime

Step 6:  Storage and Play Precautions:

The peanut gallery didn't partake in the creation of the slime but did play with it afterwards (make sure littles don't eat slime)

     We found through playing with the slime, if it comes into contact with any paper products (in this case a paper towel) it will be impossible to remove.  Therefore slime shouldn't be used around books or important documents.  

     Cleanup of any slime residue was very easy with warm water and a little soap.  The twins got in on playing with the finished product and got some on their clothes (little scraps they pulled off that landed in their laps).  It cleaned up with some warm water. 

     For storage we placed the slime in some zip lock baggies to keep the air out.  As of yet there hasn't been any issues with drying out, although I'm sure with time and continued play the slime will eventually dry out. 


Final Grade and Thoughts:


     This was a complete and total success!   Not only did the slime turn out exactly as expected, but we had a blast as a family making it.  There was a period where the mixture was really sticky and I was concerned that perhaps the ratio of ingredients were off, but true to the tutorials word, the more you mixed and played with the slime, the better the texture got. 

    I asked Gabriel what he thought of the project once we were done, and if he had any suggestions for those of you who are wanting to try this yourself.  Here are some of his thoughts:

 "Making slime was AWESOME!"

"It's kind of messy, you should use a plastic place mat"

"It's gross but feels kind of good" (when we were mixing is while it was very sticky)


    Thank you so very much for stopping by!  If you have a Pinterest  idea that you would like me to test, leave the idea (and preferably a link)  in the comments section below!  Don't forget you can also follow me on Instagram (VPNilausen), Twitter (HawkimamaV), or join me on the A Beauty In The Chaos's Facebook page (here) for additional conversations and fun.  I will see you next week! 


Twitter Delicious Facebook Digg Stumbleupon Favorites More