Saturday, January 9, 2016

2015 Favorites! Super Ultra Mega Edition!


     Hello everyone and welcome to my super ultra mega 2015 favorites post, where I look back on the past year and pick out my favorite beauty products, music, and movies for the whole year!  This is going to be lengthy so grab yourself a nice beverage because I am going to jump right in.

Movies/TV:  Star Wars: The Force Awakens

Star Wars: The Force Awakens in theaters now

     Yes, yes I am sure you have all heard about it already.  I don't care, this is my blog and it was my favorite movie so you're going to hear about it some more.  I grew up watching episodes 4-6, and I still don't care what you say or feel about episodes 1-3 but in my not so humble opinion they were absolute shit.  I still haven't fully watched the clone wars because I fall asleep every time its on.  Every. Damn. Time. 

     So needless to say, I was very skeptical when we decided to go see 'The Force Awakens' over Christmas break, and not just because we were taking my 5 year old on his first trip to the movies. Other's had reassured me that it was better, and I would like it.  I simply was not prepared for how good it would be.  

     Yes, there was a lot of lip service to fans of the original 3 movies.  A lot of nods, winks and nudges referring to chapters 4-6 that some may have found excessive.  But they were fun.  And I think they were J.J. Abrams way of assuring fans that he knew where the first 3 chapters went wrong and he was going to return Star Wars to the franchise we all remember and love. 

     It was a great movie, it was fun.  My 5 year old sat through the whole thing without so much as a whine or a question regarding when it would be over.  I am not going to go into the plot for fear I may spoil something because I get really excited talking about it.  Just go see it, I don't think you will be disappointed. 


Music:

Nothing More available on Itunes, Amazon music and local music stores
     You all know how hard this category is for me!  But I think I have narrowed it down to one album over all that has impressed me the most this year and it is the self titled album by Nothing More. 

     Nothing More does have some previously released work, however this album was my introduction to the group.  I love that the music encompasses a wide variety of topics.  One of my favorite songs from the album, 'Jenny', is particularly meaningful to me as it discusses the topics of mental illness and addiction.  The group  does a solid job of mixing in more melodic songs with the harder rock songs, making it an appealing album to a wide audience.  It's a group that my husband also really enjoys, which is a huge bonus because then we don't argue over what to listen to in the car. 

Runners Up: 'Black Widow' by In This Moment, '.5: The Gray Chapter' by Slipknot


YouTube Channels: Grav3yardGirl and Young Wild and Polished

YouTube available on your computer or mobile device
     2015 was the year that I suddenly got really into YouTube.  I don't know why it took me so long, I mean I guess I kind of always assumed it was place for random vine compilations and fail videos. OK not completely true, I have watched a lot of raid boss tutorials out there but not exactly something I would watch for solid entertainment. 

     Anyway that has all changed.  Now there are several channels I subscribe to, and these 2 girls in general I watch almost religiously.  

     If you have not seen a video by Grav3yard Girl, you might be a little taken aback by watching her the first time.  She is loud and silly and sassy and pretty much just everything I tend to be when I am at home with my family.  On her channel she makes a wide range of videos from makeup looks and first impressions, to testing out ridiculous as seen on TV products.  She has a great positive attitude that just really shines through on her videos. She never gets negative about other people or bloggers, and also makes a point to be honest and real.  She will record with or without makeup, in all manner of dress and just seems very down to earth about what she does, which appeals to me.  I probably cite her as my biggest online inspiration for jumping in and trying out blogging. 

     Young Wild and Polished is the other channel I watch every time a video is posted.  Nicole focuses mainly on cosmetics and nail products, and is absolutely hilarious.  She gets so excited about certain products (like highlighters) and the things that come out of her mouth when she describes a product, sigh, they are just to die for.  If nothing else, you have to watch a video of hers just for the outtakes where she just goes ham and says anything that comes to mind. 

     And just for the official record, neither of these girls even know I am writing this, I'm not tagging them on their social media.  I subscribe and occasionally comment on their respective channels because I am a subscriber and I enjoy the material.  In no way am I mentioning them to grab the attention of someone with a larger audience.  People are always interested in finding out what others watch on YouTube, just like movies or TV and these are simply two of my favorites. 


Book: Skin Game: A Novel of the Dresden Files by Jim Butcher

Skin Game: A Novel of the Dresden Files available on Kindle, Nook and in local bookstores
     OK so admittedly I am kind of cheating here as I read this book last year. But I read it for the second time this year, and it's still my favorite, so I think it counts.  Also to be completely fair, this is actually book 15 in the Dresden series... and I wouldn't quite recommend someone picking up this book without reading at least a few of the previous books.  Earlier on in the series the books could be read on their own, but the last few books in the series have turned kind of meta.

    So to generally describe the overall series, Dresden is a wizard that lives in current day Chicago, and as one would imagine he has to battle various forms of magical and paranormal scum that try to take over the world.  Dresden is incredibly sarcastic and witty, the books are fast paced and despite them fitting well into the urban paranormal genre, they don't have a lot of gratuitous sex.  

     Overall I would recommend this series to anyone who is looking for a fun, entertaining read that doesn't require a tremendous amount of analyzing.  I want to discuss more regarding why 'Skin Game' is my personal favorite of the series (it all comes down to one scene in the end) but, I fear by doing so it will be a bit of a spoiler.  I'll just say it left me with ALL of the feels, which can be difficult to do in a book with such an entertaining plot.

Beauty:

     Holy crap I have a ton to go over here, so I am going to go in order of how I apply the beauty products. Just to keep it all straight.


Moisturizer: Josie Maran 100% Pure Argan Oil Light - $48.00

Josie Maran 100% Pure Argan Oil Light available at Sephora and JosieMaranCosmetics.com
     Part of me feels kind of bad including a product that I just started using a month ago.  But the reality is this oil has totally changed my skin this winter. I'm not even kidding.  Usually I forgo wearing any kind of foundation in the winter because my skin will be so dry and flaky, that no matter how "dewy" the formula is, it just cakes up and looks like junk on my skin.  

     But since using this, I have seen a dramatic change.  My skin looks better, it feels better.  Not nearly as tight or itchy as it has been in the past.  I feel comfortable enough to wear foundation (which is a big step for me).  Despite having skin that is prone to breaking out if I layer on too much moisturizer, I haven't had any significant trouble with using this oil.  I will say I do put it on at night, and make sure to wash my face the next morning, just to make sure there isn't a build up on my skin.  But morning washes is something you should be doing anyway...


Primer:  Kat Von D Lock-It Featherweight Primer - $32.00

Kat Von D Lock-it Featherweight Primer available at Sephora 

     My go-to primer for mixing with the CoverFX Custom Cover Drops. The formula is extremely light and more like a lotion than a traditional face primer.  As such it doesn't do much to minimize pores or blur texture of the skin.  Also I know people with oily skin have reported that they do not like this formula, as it doesn't prolong foundation wear for them. 

     My reasons for selecting this as my favorite primer are two fold. First off as a hydrating formula, this helps prevent my foundation from settling into the dry patches on my face. Even using the Argan oil, I will still occasionally get a dry patch on my nose in the winter.  Second, unlike the thicker pore-filling primers, the Kat Von D primer does not break me out.  I will still very occasionally use a pore-filling primer on some of my trouble spots, but I can not use those formulas all over my face.  I just can't do it, my skin hates it.

Foundation: CoverFX Custom Cover Drops - $44.00

CoverFX Custom Cover Drops available at Sephora

     If you read my September Favorites post (here), you already know how I feel about these pigment drops.  In a word, they are AMAZING.   

     What I love most about these drops is how completely versatile they are.  First off they come in 24 different shades which can also be mixed together to blend custom shades specific for your skin tone.  Second they can be mixed with anything.  Have a favorite primer you like to wear?  I usually mix my drops with the Kat Von D primer for a single-layer application.  Want more of a BB cream?  Mix a single drop in with your favorite moisturizer for a hydrating sheer coverage.  I have even mixed a bit in with my Argan oil.  

     The only thing I really do not like is over time my bottle has become quite messy.  If there is any product up in the "cap" part of the lid it will eventually smear down on the threads when you replace the cap.  It's not the end of the world but when you see how little product you need for a full coverage face, you can deduct that several applications are being wasted.  


Contour, Bronzer, & Matte Highlight: Kat Von D Shade & Light Contour Palette - $46.00

Kat Von D Shade & Light Contour Palette available at Sephora 

     I will admit, it took me a really long time to get comfortable with contouring. Despite watching countless videos on YouTube and understanding the basic premise of what to do, anytime I tried it out myself it just looked... off.   

    So I finally hauled my butt to Sephora and admitted to a lady that worked there that when it came to contouring I just had no clue.  She sat me down and picked out a few different products to try out. This is the one I fell in love with.  It's the one I felt was the easiest to use and the most foolproof. 

     If you are like me and new to contouring, you want something that will easily blend and can apply lightly and then build up.  This formula works great for that.  The powders are very finely milled and like I said just blend out very nicely so there are no harsh lines. They are nicely pigmented and if you are looking for something more dramatic, they certainly can be built up for a more chiseled look.

      I use the cool toned lightest shades on the far left side as my contour and highlight.  Then I use the middle shade as a light bronzer.  The rest of the palette is too warm for me, perhaps in the summer when I have more color I might be able to use them, but for now I re-purpose them as eye shadows. 


Shimmer Highlight: Hourglass Ambient Lighting Palette - $58.00

Hourglass Ambient Lighting Palette available at Sephora and Hourglasscosmetics.com
      Admittedly this is a huge splurge.  It's certainly more than I ever care to spend on any kind of cosmetic, let alone a highlight.  But the formula of Hourglass's ambient lighting powders are truly phenomenal.  ESPECIALLY for aging skin like mine. 

     The powder is so finely milled, and the "shimmer" is more like an all over glow than most traditional highlighting formulas which can contain a lot of glitter. I will choose this formula over the Becca highlights any day (although I do enjoy those too).  The Hourglass formulas don't exaggerate my pores or skin texture the way other highlights can. This in my opinion is just a far superior product.  Unfortunately the price reflects that.   


Blush: Sephora Collection Colorful Face Powders - $15.00

 
Sephora Collection Colorful Face Powders available at Sephora
     If you go into Sephora and neglect to stop by the Sephora brand collection, you are doing yourself a huge disservice. They have expanded the collection considerably and have reformulated some products including their blushes.  

     The result is a blush formula that holds it's own against many of the more expensive brands including Too Faced and Tarte.  I currently own three shades, Love Sick, Flirt it Up, and I'm Quite Tipsy and I will probably expand my own collection more in the future.  The powder is finely milled and blends very easily.  The blushes are a nice level of pigmentation.  They aren't so intense that you have to worry about clown face, but you still feel you get your money's worth.  

     The wear time is nice as well.  I don't feel they break down or disappear any faster than my Tarte Amazonian Clay blushes or the Too Faced Love Flushes, despite them being a considerable bit cheaper.  

     Also as an added bonus they are starting to include contour, bronzer and highlighting shades.  Selections within these groups are still limited.  I couldn't find a shade that looked quite right for my skin tone, but the feel of the powder is the same as the blushes.  If you can find a flattering shade, it's definitely worth a try.


Eyeshadow:  ColourPop Super Shock Eye Shadows - $5.00

     
ColourPop Super Shock Eye Shadows available at ColourPop.com
     There is a reason why the Internet won't stop talking about these shadows.  Are they a cream?  Or are they a powder?  I don't really know, but I love them anyway!  

     There is an insane selection of colors. I think 96 last time I checked, not including the exclusive colors that come in the limited edition and collaborative sets.  The formula is long wearing, doesn't crease (I do suggest a primer), is easy to work with (use your fingers), and again  ONLY $5.00!

     This is easily my favorite brand for more funky colors that I may not wear often.  I do not feel nearly so guilty experimenting with a new color if I only paid $5.00 versus $18.00 for an Urban Decay single.  Yet the color intensity, pigmentation, and variety of finishes all compare to that of high end brands that charge three times as much for their products. 


Eyeliner: Urban Decay 24/7 Glide-On Eye Pencil - $20.00

     
Urban Decay 24/7 Glide-On Eye Pencil available at Ulta, Sephora, and UrbanDecay.com
     OK another insanely expensive product.  I do love these pencils though.  As a contacts wearer, I do have sensitive eyes that occasionally water, especially when I have to adjust a contact or something similar.  As such I have the worst time with eyeliners staying still on my eyes. 

     I have tried countless brands and formulas.  Some work better than others.  Some work just as well as the Urban Decay (see my runner up).  But what they lack is the variety in colors that Urban Decay offers.  

     There are 37 different colors of eyeliner in the 24/7 Glide-on line. 37.  Granted I only have like 2, but if there were ever a color that you were looking for,  Urban Decay probably has it.  In addition the formula goes on really easily.  It's creamy and doesn't pull or tug at my lids while I'm applying it.  I wish I didn't like this as much as I do, because yeah.  That's expensive.  

Runner Up: L'Oreal Voluminous Smoldering Eyeliner - $8.95 (comes in 3 colors, but has a nice formula)


Mascara: Maybelline Lash Sensational Waterproof - $8.99

Maybelline Lash Sensational Mascara available in most drug and discount stores

     When it comes to mascara, nothing beats the drugstore.  I find it incredibly hard to pay high end prices for mascara for a few reasons.  1. Your mascara should be changed out quite often to avoid bacterial contamination and 2. I have yet to find a high end mascara that I feel works good enough to deserve the extra cost.  

     What I have been using for months, and will probably continue to use is the Maybelline Lash Sensational mascara in the waterproof formula.  It is a thinner formula, a bit more wet than other mascaras.  For those looking for something more volumizing this might not be the best choice.  I personally don't like many volumizing formulas, so this works great for me.  It does darken and lengthen nicely, and usually I only require one coat.  

    The wear time is very nice.  I don't experience any flaking with this formula.  I haven't had any running or smearing issues with it either.  Because it is a wetter formula, you do need to give it some extra time to dry your you might get some dots on your lid from the tips of your eyelashes, but those are easy to deal with once they dry. 


Lipstick - Too Faced Melted Liquified Long Wear Lipstick - Melted Fig - $21.00

     
Too Faced Melted Liquid Lipstick available at Ulta, Sephora and TooFaced.com
     I know I just went on about this in the Too Faced brand review (here), but I'm going to do it again.  And for good reason.  This is probably my favorite lipstick of all time.   

    Yes, you will hear me rave about some other formulas.  And rightfully so, this isn't my most favorite formula.  But this IS my favorite color.  It's this perfect cool tone mix of both pink and orchid.  It just looks awesome.  I wear it all the time, even when I say I am going to try something else or a new color I end up reaching for this instead.  For that alone it gets my pick for favorite lipstick of the year. 


Makeup Brushes: Morphe Brushes - price varies by brush

Morphe Cosmetic Brushes available at morphebrushes.com

     I wish I had found out about Morphe brushes sooner.  I really do.  Makeup brushes are expensive! Yes, there are some good ones to be found in the drug store.  I really like Sonia Kashuk, and brushes made by Real Techniques.  But they do have a limited selection of styles and shapes. 

     If you are looking for some more specialized brushes, especially for face and eyes I highly recommend checking out Morphe.  I have a few brushes and I love each of them and use them often.  I wash them regularly and have had no issues with any of them losing shape, or hairs shedding/falling out.  The ones I have received have all been very soft and comfortable to use, and they are a fraction of the price that you see brushes go for in Sephora or Ulta. 

     The only thing I am not in love with, is they are only available online (unless you live in Burbank, California and go to the one retail store they have).  Buying online isn't inherently a problem, but if you are like me, you want to look and feel the brushes you are going to purchase.  It's hard to gauge size with a single picture.  To help with that usually I visit a Sephora or Ulta and find a brush that I like, and write down the description then visit Morphe and find a brush that best matches the description.  So far this process  hasn't let me down, and it has saved me some money. 


Makeup Remover: Bioderma Sensibio H20 - $6.95 - $19.95

     
Bioderma Sensibio H20 is available at Beautylish.com
     I discovered this makeup remover in Paris, and I stocked up.  It (with some other purchases) cost me a lot in extra luggage fees. My husband wasn't so happy that day.  But I do love this micellar water cleanser.  It is super gentle, doesn't dry out my face at all, it doesn't burn my eyes like  makeup wipes and other removers do.  And yet, somehow it still removes all my makeup including my waterproof mascara. I use it both as a makeup remover and as a morning cleanser. 

     Right now the only place to get it is through Beautylish.com.  They offer a flat shipping rate of $5.00, unless your order is over $35.00 in which shipping is then free.  So shipping isn't horrible considering a 500ml bottle of this isn't light.  Of course as with anything else it's more cost effective to purchase in the larger bottles, however it should be noted that the lids don't come off like normal lids, so it is rather difficult to decant this into smaller bottles for travel and such. 

     As a side note Garnier has come out with it's own micellar water, that looks very similar to this.  I have not yet used it.  I'm going to wait until I am finished with my current open bottle then I am going to test it out.  If it works the same, it will be awesome at is is half the cost ($8.00 for roughly 400ml).


     Oh my goodness, that is it.  So many words!  LOL Thank you all so very much for stopping by and reading through this monster of a post.  As always if you think there is something I should try out, or if you have favorite picks of your own, feel free to share them in the comment section below!  Next week I will return with a Pintertest post.  Hint: this one worked!  So I hope to see you next week!

Wednesday, January 6, 2016

December Ipsy Vs. Boxycharm


     Hello everybody and welcome to 2016!  To celebrate this new year we are... headed back to last year?  Ok. So, maybe this post is a bit late. The holiday season was very busy for us and I just didn't get around to taking the photos for this until after the new year.

     But it's all good as the extended time has given me some chances to try out more of the products and establish a better review of them!  Also as a quick update from my November Ipsy (can be read here) - I am in LOVE with the Josie Maran 100% Argan Oil Light.  I actually went and bought a full size of it from Sephora.  It has saved my face this winter and has not broken me out at all!

     Anyway you know the routine.  Boxycharm is $21 a month and usually offers 5 full sized for deluxe samples of higher end products. Ipsy is $10 a month and usually offers 5 sample or trial sized products from both drugstore and high end brands.  If you are interested in getting yourself a subscription to any one of these programs you can check out my referral codes on my favorites page (here).  I do not get paid for referrals but I do earn some points which I can then use to redeem additional products.


Ipsy:

December 2015 Ipsy bag and products it contained
     I completely lost the card for this month's Ipsy bag. :(  So I don't know what the theme is.  However the products came in this bright red patent vinyl bag.  Not one of my favorites.  It's just kind of boring, and reminds me Halloween boots for some reason.  But in a bad way.... 

Jersey Shore Spa Anti Aging Lip & Hand Polish - Vanilla Bean:

Jersey Shore Spa Anti Aging Lip & Hand Polish in Vanilla Bean
     An all natural sugar scrub for both your hands and lips, this reminded me a lot of some home made recipes.  It smells absolutely divine! Seriously, after use you smell like cookies or some kind of cake batter.  The taste isn't too bad either, so don't worry about using this product on your lips. It's loaded with shea Butter, Cocoa Butter, Jojoba Oil and Coconut oil, so it does a fair share of moisturizing in addition to the exfoliation that the sugar provides. 

    Per the directions, I warmed this a little by running under some warm water before using. I think you could probably skip that step if you wanted to, the product would be a bit thicker but nothing unmanageable.  Overall I really like it, so I looked up how much it would cost to buy the product.  $25.00.  Ok, I liked it, but not that much.  Honestly, with all the DIY sugar scrub recipes that one can find online... one can easily make something very similar (if not this exact product) for a fraction of the cost.  

Marc Anthony Deep Nourishing Conditioning Treatment:

Marc Anthony Deep Nourishing Conditioning Treatment
     Another conditioning treatment for hair.  I haven't tried this one yet as I am not even close to finished with the other 5 hair treatments that I have received from Ipsy.  It smells nice.  It has a very strong coconut scent which I like, but if you are turned off by coconut you probably won't like it.  Eventually I will get around to using all these treatments and if I find one that just completely blows me away I will make a comment about it similar to what I did above with the Josie Maran Argan Oil.

Pacifica Power of Love Natural Lipstick - Nudie Red:

Pacifica Power of Love Natural Lipstick 
      I don't know how else to put this.  There was absolutely nothing I liked about this lipstick.  Just nothing.  For starters, the color looks abysmal on me (most warm browns do).  I know its a very popular color trend right now, but it just looks horrible with my skin tone.

Pacifica Power of Love Natural Lipstick in Nudie Red swatch
     That's not the only reason I disliked this lipstick.  The smell really turned me off.  Being a natural brand, I know Pacifica probably tries to avoid adding fragrance or extra ingredients into their costmetics, but this lipstick smelled horrible.  It just had a very strong plastic cosmetic scent, and I felt like I could almost taste it while I was wearing it.

     Which brings me to the final point. This is also a very uncomfortable lipstick to wear.  It was dry going on, and despite it settling and accentuating every single line and crack on my lips, it never felt like it melded into my lips.  It always just felt like a waxy coating on top.  I eventually just wiped it off through part of my day and put on a lip gloss.

Elizabeth Mott Thank Me Later Eye Shadow Primer:

     
Elizabeth Mott Thank Me Later Eye Shadow Primer
     I have not fully tested this product either. I did swatch it on the back of my had.  Its a thicker primer that has a strong silicone like feel to it.  There is a very light scent but it is not unpleasant.  It dries clear, so there is no color correction properties to it which is something I really like.    There's nothing about it that strikes me as a mind blowing primer, but there's nothing that screams "horrible product" to me either.

Peony Shadow Trio:

Peony Shadow Trio, very small package total weight is .3g/0.11 oz
     I'll admit it. I am really critical of eye shadow.  I know it, and as such there may be times where I come down kind of hard on some products that other people may like.   But it's for good reason.  I know for a fact there CAN be good quality eye shadows that are available at drugstore pricing.   

     So when I look up this brand and see that they are charging $17.95 for THIS EXACT trio of shadows. I get a little irate.  This product was horrible.  Nevermind getting it to show up on my eyes using a brush or sponge,  I couldn't even get the light color to swatch using my finger!  The other two shades had a terrible color pay off as well.  The best looking one was the shiny bronze color, and even that was pretty sheer, and it didn't build well.

Peony Shadow Trio swatches, multiple passes were used to get this color. 
     In short this is a formula I would be angry to deal with even in a cheap product.  To see a trio this small reaching high end pricing and still delivering this kind of crap... it bothers me.  "But Valerie," you may say "This is a 'natural', cruelty-free, cosmetic! Surely it contains better ingredients that make it deserving of a higher price point." 

     Wrong.  The very 1st ingredient in this shadow is talc. Ok now, I'm not going to go on a tirade about talc. It's a very common filler and is present in almost every single eye shadow formula.  However, pricier more designer brands tend to limit the amount of talc used in their formulas.  It's considered a relatively cheap additive and is used heavily by less costly brands.  Again, it's the first ingredient listed, likely the most used.  Draw your own conclusions. 


Boxycharm:

December 2015 Boxycharm and the products it contained 
     This month's boxycharm theme was "Pop Fizz Clink!" The card reads "Get Ready to revel in the charm of an era of decadence and glamor! This Month, we celebrate a revolution in style by taking beauty back to a time when Jazz, boas, glitter and pearls hit it big. So raise your champagne glasses, charmers, and get ready for a roaring celebration!"

Tatcha Petal Fresh Original Aburatorigami - full size - $12.00

Tatcha Petal Fresh Original Aburatorigami Beauty Papers
     $12.00 blotting papers. Wow.  They have gold leaf flecks in them.  I don't know what that is supposed to do, if anything.  I like Boxycharm if only that it lets me get some crazy products that I would never buy myself.  I feel like this is one of them.  Aside from the fact that I rarely need to blot my face, when I do, I don't use expensive paper. 

Jelly Pong Pong All Over Glow - full size - $15.95

    
Jelly Pong Pong All Over Glow Gel Luminizer
     Well they did say they were taking beauty back to a time of glitter.  This luminizer gel definitely does that!  It's not straight up glitter, but this is very shimmery. It does blend nicely (I just used my finger), but it leaves a fair amount of shimmer all over whatever you are blending with. It also has a very sweet scent that is fairly strong.  It's reminiscent of coconuts, although more the sun tan lotion coconut, not the candy. 

Jelly Pong Pong All Over Glow Swatch, highlight can be seen best by my index knuckle
    Ultimately I just don't know quite what to do with this.  The wear time doesn't seem all that great, I put some on the back of my hand and the majority of the sparkle wore off within an hour.  That being said the product is so intensely shimmery, one could easily run the risk of looking like a disco ball if they were to re-apply throughout the day.  

NCLA So Rich Cuticle Oil - full size - $18.00

NCLA So Rich Cuticle Oil 
     I love this product.  I was excited to try it out when I saw that I received it, as I have read some decent reviews. It has helped my cuticles so much during this past few weeks.  I usually am pretty bad about applying cuticle oil throughout the day after I wash my hands.  I only put it on at nighttime and even that has helped a lot. My cuticles have stopped peeling despite we are entering the harshest part of winter. 
 
     The oil does contain a lavender type fragrance.  It can be pretty strong so if you don't like lavender I would probably avoid this cuticle oil.  If that doesn't bother you, I recommend this.  It has a nice glass dropper verses the brush, which is just a personal preference for me. 


Nelson J Argan Oil 7 Moisture Healing Mask - full size - $23.00

Nelson J Argan Oil 7 Moisture Healing Mask 
     Another hair treatment!  Yay!  Ok this one I am curious about as it says it will protect against chlorine damage.  I love to swim and I hate that chlorine in swimming pools absolutely destroys my hair color. This has instructions to apply to wet hair (and leave in) before swimming.  It also has directions to use as a pre-wash treatment and as a mask you set under a dryer after shampooing.  All of these are very different from the traditional leave-in or rinse out treatments I have received, so I will be sure to try this one.

Side note:  it does have an extremely strong coconut scent to it.  When I first opened my box I actually thought maybe the bottle had ruptured the scent was so strong.  Not only is it not ruptured but it has a foil seal on the end.  So yeah, they aren't playing with the scent. 

Ofra Long Lasting Liquid Lipstick - Americano - full size - $19.90

Ofra Long Lasting Liquid Lipstick in Americano
     I was SO excited when I saw on the card that this box contained an Ofra liquid lipstick.  If you stalk YouTube like I do, you know there is a lot of buzz regarding this formula.  Imagine my dismay when I dug out this beautiful tube of.. dark orangish redish brown. Sigh. FML.

Swatch of Ofra Long Lasting Liquid Lipstick in Americano
    Ok I brought myself to do it, I wore it for a bit.  It's still not my color. Not even a little bit.  BUT I do love the formula. So much so that I went and bought myself two better suited shades from the website. The formula is really, mousse-y for lack of a better word.  Most liquid lipsticks are rather thin in consistency.  This is not.  Its thick, but it does go on smoothly and the wear is fairly comfortable for a lipstick that dries down.  

    I am not a fan of the smell, it's a fake sweet scent.  Oddly enough one of my new colors had it and the other one did not.  Americano had it which leads me to believe that most of the shades do have the scent.  It dissipates fairly quickly, so it's not a total deal breaker.  

BellaPierre Waterproof Gel Lip Liner - Cinnamon - full size - $17.99

BellaPierre Waterproof Gel Lip Liner in No. 03 Cinnamon
     A lip liner to match the lipstick.  Again its a warm brown, but not quite as orange/red as the lipstick.  I can pull this off if I use it under a different shade of lipstick to create a custom color. 

Swatch of BellaPierre Waterproof Gel Lip Liner in No. 03 Cinnamon
     The formula is really nice, it goes on smoothly, it doesn't pull at my lips while lining them. I don't know about the waterproof claims, I tend to avoid wearing cosmetics to the pool or beach, but the wear time was nice for a typical day. 


Thank you so much for stopping by!  I love to see what other people got in their Ipsy bags and Boxycharm boxes - if you have a blog or you tube video of what you received, place your link in the comments below and I will check it out!  See you next week! 

Tuesday, December 29, 2015

The Pintertest Files: DIY Erin Condren Cover


     Hello everyone and welcome to the inaugural episode of the Pintertest Files!  Where once a month I select a crafty DIY Pinterest post, try it out myself, and report back if it worked, if it was easy, or if once again Pinterest lied to us.  

     Since we are quickly coming up on the new year, for this month's Pintertest I have selected a DIY cover for the ever popular Erin Condren LifePlanner.   If you are unfamiliar with these day planners you can check the brand out here.  Essentially they are a nice and almost completely customizable day planner.  They have removable, plastic covers that you can swap out for different designs, but each cover comes with a pretty heft price tag (starting at  $10.95).  So of course when I saw that there may be a way to make these covers yourself, I had to try it out.

The following DIY is based on real life events, names and places have been changed to protect identities.  Viewer discretion is advised.

What You Will Need:


Materials needed as listed by original Pinterest tutorial

  • Erin Condren LifePlanner
  • Pretty Paper/Photos
  • Scotch Self-Seal Laminating Sheets, size 8.5"x11"
  • Scissors
  • Paper Hole Punch 
  • Ruler
  • Marker or Pen
  • Optional - double sided tape


Step 1: Measure and Cut Paper to Match Original Cover Size

Measure the inside "design" aspect of the cover, not the plastic.

     This is fairly straightforward and easy, simply measure the design element within the original cover (the paper part not the plastic) and cut your new paper to match that size. 


Step 2:  Use Tape to Adhere Outside Cover Paper to Inside Lining Paper

Front cover design and inside lining. 

     This step was labeled optional, and to be used only if you were planning on using a different design of paper for the inside lining of your cover.  This step can be skipped if your cover will consist of only 1 sheet of paper. It was suggest that if you are making a collage of photos for your cover, you adhere them to a backing piece of paper. 


Step 3: Laminate The Outside Part of the Cover

First layer of self laminating material, adhesive side up.

     Pull the backing off one sheet of self laminating material.  Place it flat on the work surface, adhesive side up. Next, take your design paper and lay it front side down in the middle of the adhesive sheet.  Leave plenty of adhesive material exposed as a border around the paper. 

Application of the first layer of laminating material.

     Again this step was fairly straight forward.  The laminating sheets are really static-y and as such want to fold over on themselves when pulling the back off.  If proper care is used it shouldn't be an issue, more of a minor annoyance. 

Step 4: Laminate the Inside Part of the Cover

Application of the second layer of laminating material, cover paper 'sandwiched' between sheets. 

    Pull the backing of a second sheet of self laminating material.  Slowly and carefully place it, adhesive side down, over the paper and first sheet of laminating material.  This will create a "sandwich" of laminating material with your designer paper in the middle.  Press firmly to remove all air bubbles, and seal around the edges of the paper where the two laminating sheets meet.

     This was a bit trickier as you only have ONE shot at this, so you better do it right.  Once the laminating sheets are down, there's no pulling them back up or apart.  Immediately upon pressing out all the bubbles, it became apparent that a larger clear plastic border will be necessary for this cover (vs the original), as the thickness of the paper prevents the two laminating sheets from meeting up immediately at the edge of the paper.  

Step 5: Trim Excess Plastic Away 

Front and back covers, fully laminated and excess plastic trimmed. 

     Trim the excess laminating material away.  Leave 1/2" margin on the side for hole punches, the remaining 3 sides leave a 1/4" margin. 

    Even though this step went off with out a hitch, it was at this time I start doubting the structural integrity of this project.  The original cover that comes with the planner is so much thicker and sturdier.  It's obvious that some kind of thermal plastic is used, not the flimsy plastic sheets utilized in this tutorial.  My original cover is showing some wear and tear on the corners and on the punched part where it connects to the spiral planner. If the thick plastic of the original cover can't hold up to daily use, no way is this flimsy laminate material going to. 

Step 6: Mark the Locations Where the Punches Need to Go

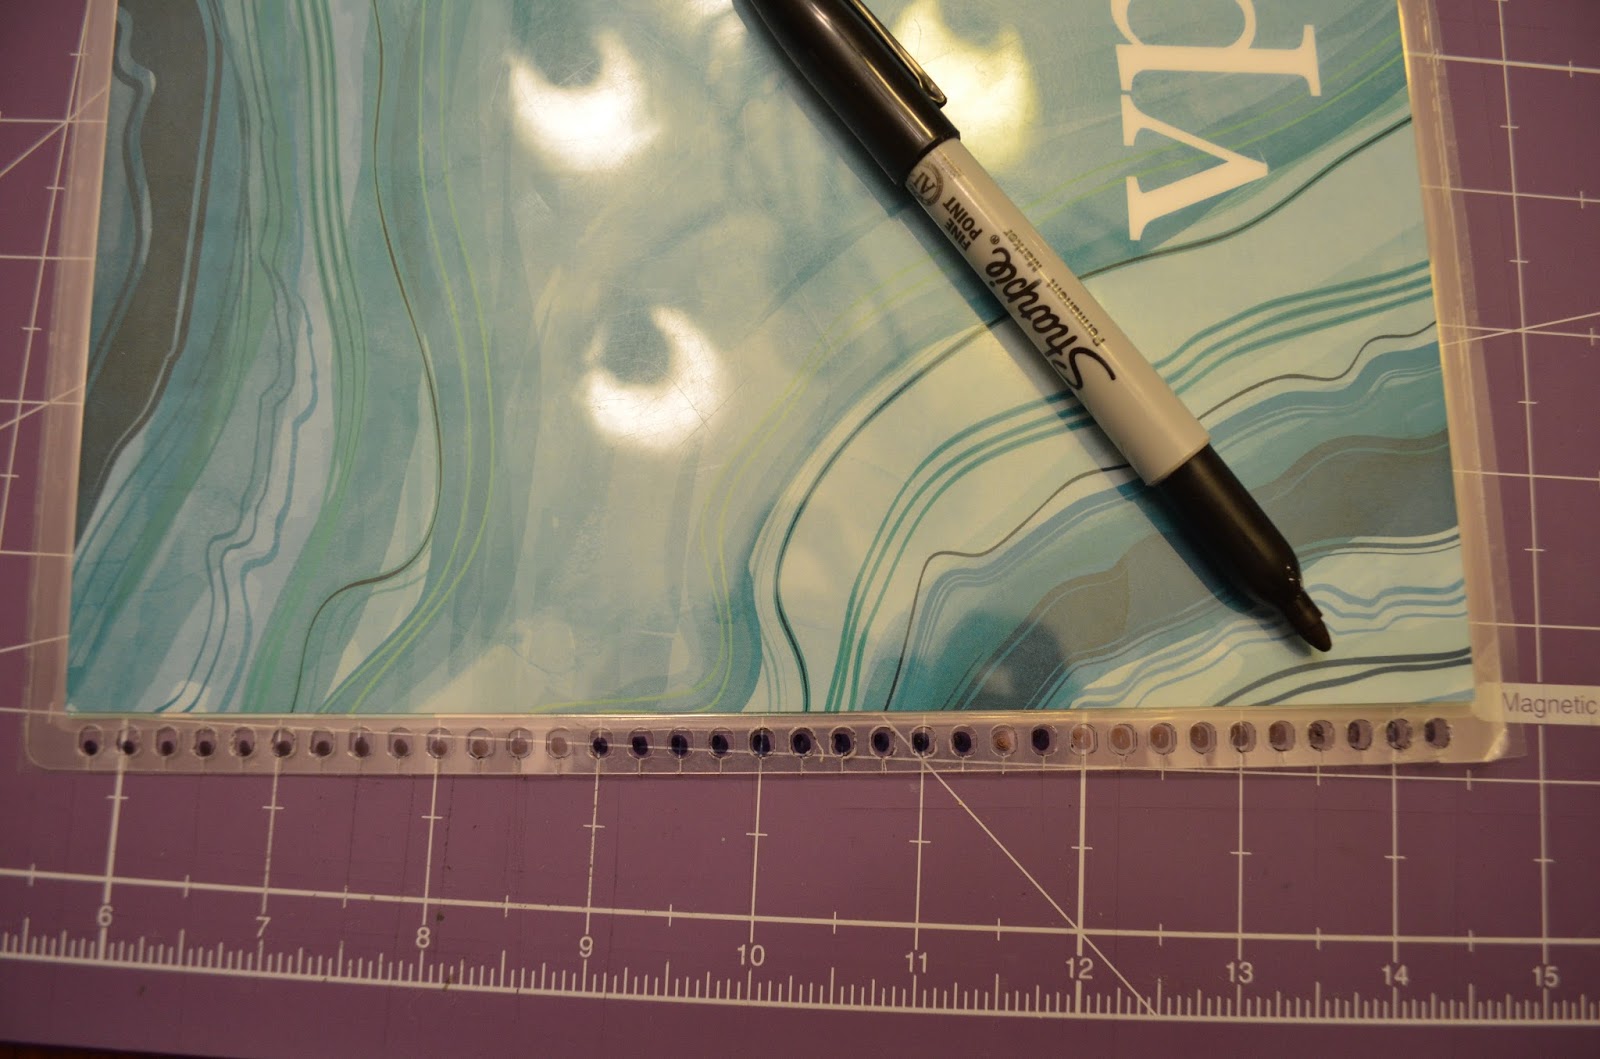
Marking hole punch locations using original cover as a template. 

     The beginning of the end. It was at this step that I recognized the first big mistake in the DIY instructions.  The holes on the original cover are not basic hole punch holes, but rather are made with a professional binding machine.  This is to be expected, clearly a company would use such a machine vs having a bunch of people hand punch holes in the covers.  However, the holes in the machine punched covers are smaller than a standard hole punch and the holes are oval, not circular. 

     Immediately it was obvious that the standard 1/4" hole punch was going to produce holes WAY TOO large for this project.  I quickly wrote this off as my own mistake, that I somehow overlooked instructions where it stated that a 1/8" craft punch should be used.  But no, the instructions didn't say anything specific about size, just "hole punch."  

     Also this tutorial claimed all materials could be found in discount stores such as Target or Walmart.  Just to explain the hole punch debacle, I actually bought a brand new hole punch from Target (a nice craft one) as my previous hole punch was lost somewhere in our move.  There was no size option just a cheap silver version vs a more expensive model. I splurged for the craft version. 


Step 7: Punch Out Marked Holes With Paper Puncher aka Where it All Went Down In Flames

First few punches produced less than stellar results. 

     Despite the issues with the hole punch size, I decided to move forward with the project.  I don't like to toot my own horn, but usually I can figure out ways to make things work.  I thought at worst perhaps I punch out over other hole to make up for the increased size.

Crafting punch, purchased at Target.  

     In hindsight I should have just threw it all away and set it on fire because the next 15 minutes of my life were nothing but a blur of jammed punches, cursing and vowing never to do another project again.  Ok, maybe that's a bit dramatic, there WAS cursing though.  

Example of how the plastic material would jam the hole puncher. 

     I don't know what type of black magic voodoo cursed crafting wizard the original author of the tutorial was, but there is no way in hell that plastic laminate material was going to cut cleanly with a paper hole punch.  There is just no way.  The plastic was too flexible.  Most of the time it stretched and ripped before the punch could cut it cleanly.  Several times it jammed up the punch, requiring me to use considerable force to pry it open.  

Final result of jammed hole puncher.  Note how the plastic stretched, then tore. 

Project Grade and Final Thoughts:


     There are different types of laminating material offered by Scotch.  Including a self laminating pouch and a thermal type that requires a laminating machine.  Maybe one of those would work better?  Maybe if I had a different paper hole punch?  Or maybe the original author sacrificed a goat to the Martha Stewart gods and is now blessed the ability to work crafting miracles (I'm voting on the later).

   
   If you have a Pinterest project that you would like me to test, feel free to comment below or email me at ABeautyintheChaos@gmail.com.  Thank you so much for stopping by!  See you next week! 

Twitter Delicious Facebook Digg Stumbleupon Favorites More