Showing posts with label Pintertest. Show all posts

Friday, February 19, 2016

The Pintertest Files: Brownie in a Mug


      Hello all and welcome to a VERY late Pintertest File!  Brought to you by Mediacom (#notsponsered) who decided to do "maintenance" this week resulting in us not having a reliable Internet connection for a good chunk of the week!  Thanks!

     If you live pretty much anywhere in the Midwest like I do, you have recently been experiencing some seriously crappy cold weather.  Now I like myself a good winter, but when it gets to be February I am pretty much over it.  Luckily for me that is just about when Iowa weather decides to take a turn for the worst and get really cold.

     So being that I didn't want to leave my house at all this past week.  I had to come up with a Pintertest that could be tested with objects/ingredients that we already had.  Throw in every one's love for a tasty baked good and we have this month's file: the brownie in a mug.

     Pinterest is FILLED with these single serve baked delights, brownie in a mug, cake in a jar, cookie in a cup, 4 course steak dinner in a mason jug... if you haven't seen a post for one of these, you haven't been browsing Pinterest.   But the question that has always lingered on my mind is... do they actually taste good?  Tonight we found out.

What You Will Need:


  • 2 tablespoons of lightly flavored oil (don't break out the extra virgin olive for this)
  • 1/4 cup all-purpose flour 
  • 2 tablespoons cocoa powder
  • 1/4 cup brown sugar
  • 1 1/2 tablespoons water 
  • 1/2 teaspoon vanilla extract 
  • 1 large egg
  • Pinch of salt (optional)
  • Mixing Bowls
  • Measuring Cups
  • Microwave

Step 1:  Sift the Dry Ingredients Together


     In a mixing bowl sift together the cocoa powder and the flour.  Cocoa powder usually has some clumps so sifting is preferred but not absolutely necessary. 

Step 2:  Whisk the "Wet" Ingredients Together


      In a separate mixing bowl whisk together the egg, oil, brown sugar, water, vanilla, and the salt (if used). 


Step 3:  Whisk Ingredients Together and Pour into Mug


     Whisk the wet ingredients into the dry ingredients until combined.   Pour into desired mug.  I read in multiple sources that a tall skinny mug works best at reducing the chances of the mix rising over the top of the mug while cooking.  Since scraping burnt chocolate off microwave floors is just not my scene, I went with that. Whatever you use, just make sure the mug is microwave safe and can hold 12 ounces. 


Step 4: Microwave


     Clean up any drips around the edges of the mug, then place in the microwave for 1 minute and 45 seconds.  You may need more or less time depending on the power of your microwave and the mug being used.  Our microwave is an old 950 Watts microwave with a broken turn table.  So less time may need to be used in a newer model. 

Step 5: Serve 


      CAUTION: the brownie will be extremely hot!  Also this makes a very good sized brownie, it can definitely serve more than one person.  I took it out of the mug and cut it up in thirds to serve, and it was still a satisfying amount of brownie, especially when served with ice cream.


Final Grade and Thoughts:


     This tasted pretty damn good.  It wasn't a dense fudge-y brownie, it had more of a spongy cake-like texture.  But it was tasty and definitely would fill a craving.   The recipe was quick and easy enough, although for a "single serving" treat it did produce a lot of dishes (separate mixing bowls).  It leaves me wondering how this would turn out if one were to try and stir all the ingredients together directly in the mug.  Overall I would recommend this to anyone who would like to indulge in a sweet treat without having a pan of left over brownies tempting them the rest of the week. 


Tuesday, January 12, 2016

The Pintertest Files: DIY Glitter Slime


    Hello everyone and welcome to the Pintertest Files!  Where I take a popular Pinterest post, test it out, and report back if it worked as promised, how easy it was, and if it is worth trying out yourself.

     January is always a tough month to get through, at least here in Iowa.  The big holidays have passed, there isn't any more vacation time to look forward to, and it is frigid outside  (today's high was 0).  All this adds up to some seriously stir crazy kids that make you realize bears have the right idea when they just hibernate on until spring.

     It's with this desperation for child entertainment that I chose DIY Glitter Slime as our next Pintertest.  The easy 3 item recipe that is posted on every mom blog the Internet wide, promising a colorful sensory playtime favorite that is not only easy to clean up, but impossible to mess up.

     A very special thank you needs to be sent out to my talented helper Gabriel who enthusiastically helped me test out this project and even offered some insight (see below).  Also to my husband who helped take photos when things got a little sticky.


What You Will Need:

Items needed to create slime all available at Wal-Mart 
  • Liquid Starch (I could only find at Wal-Mart)
  • Clear washable glue (with or without sparkles, it doesn't matter)
  • Water
  • Glitter 
  • Measuring Cup
  • Mixing Bowls
  • Spoons or stick to stir with
     All materials are fairly easy to find, save for the liquid starch. I could only find that at Wal-Mart.  Not really an issue except that I had looked in two other stores first before heading there. 

Step 1:  Mix Water and Glue

For glue solution mix 1 container of Elmer's clear washable glue with 1/2 cup warm water

     Measure out 1/2 cup of water, place it in the mixing bowl.  To the water add a full container of the clear washable glue.  Mix until the solution is consistent and clear. 


Fully mixed solution will be clear and slightly thinner than the normal glue texture

Step 2: Slowly Add Liquid Starch to Glue Solution

You will need 1/2 cup of liquid starch, add it to the glue solution bit by bit for easier mixing

     Measure out 1/2 cup of liquid starch. Bit by bit, add the liquid starch to the glue solution and start mixing like you have never mixed before. 


As soon as the liquid starch is added, gel slime starts forming. 


Step 3:  Mix Until Your Arm Falls Off


Solution is fairly easy to mix at first

      Sore yet?  Keep mixing.  The mixture is going to be the delightful texture of baby snot. Pretty soon it will be impossible to stir with the spoon which is when you are ready for the next step...


As more slime develops it becomes increasingly more difficult to stir with a spoon

Step 4:  Ditch the Spoon and Start Mixing With Your Hands


At first the slime is VERY wet and difficult to hold

     I should mention that at the exact point you grab the full blob of mucous-y goodness and start kneading it, it is going to stick absolutely everywhere all over your hands.  You will doubt the ratio of ingredients, you will doubt that this will work.  Hell you will doubt your reasoning skills to involve your 5 year old in this hot mess of a project.  Keep kneading and mixing.  It gets better. 


With continued kneading it gels up but remains very sticky

Keep kneading, eventually it will solidify more and stick to hands less and less

Step 5: Mix in Glitter


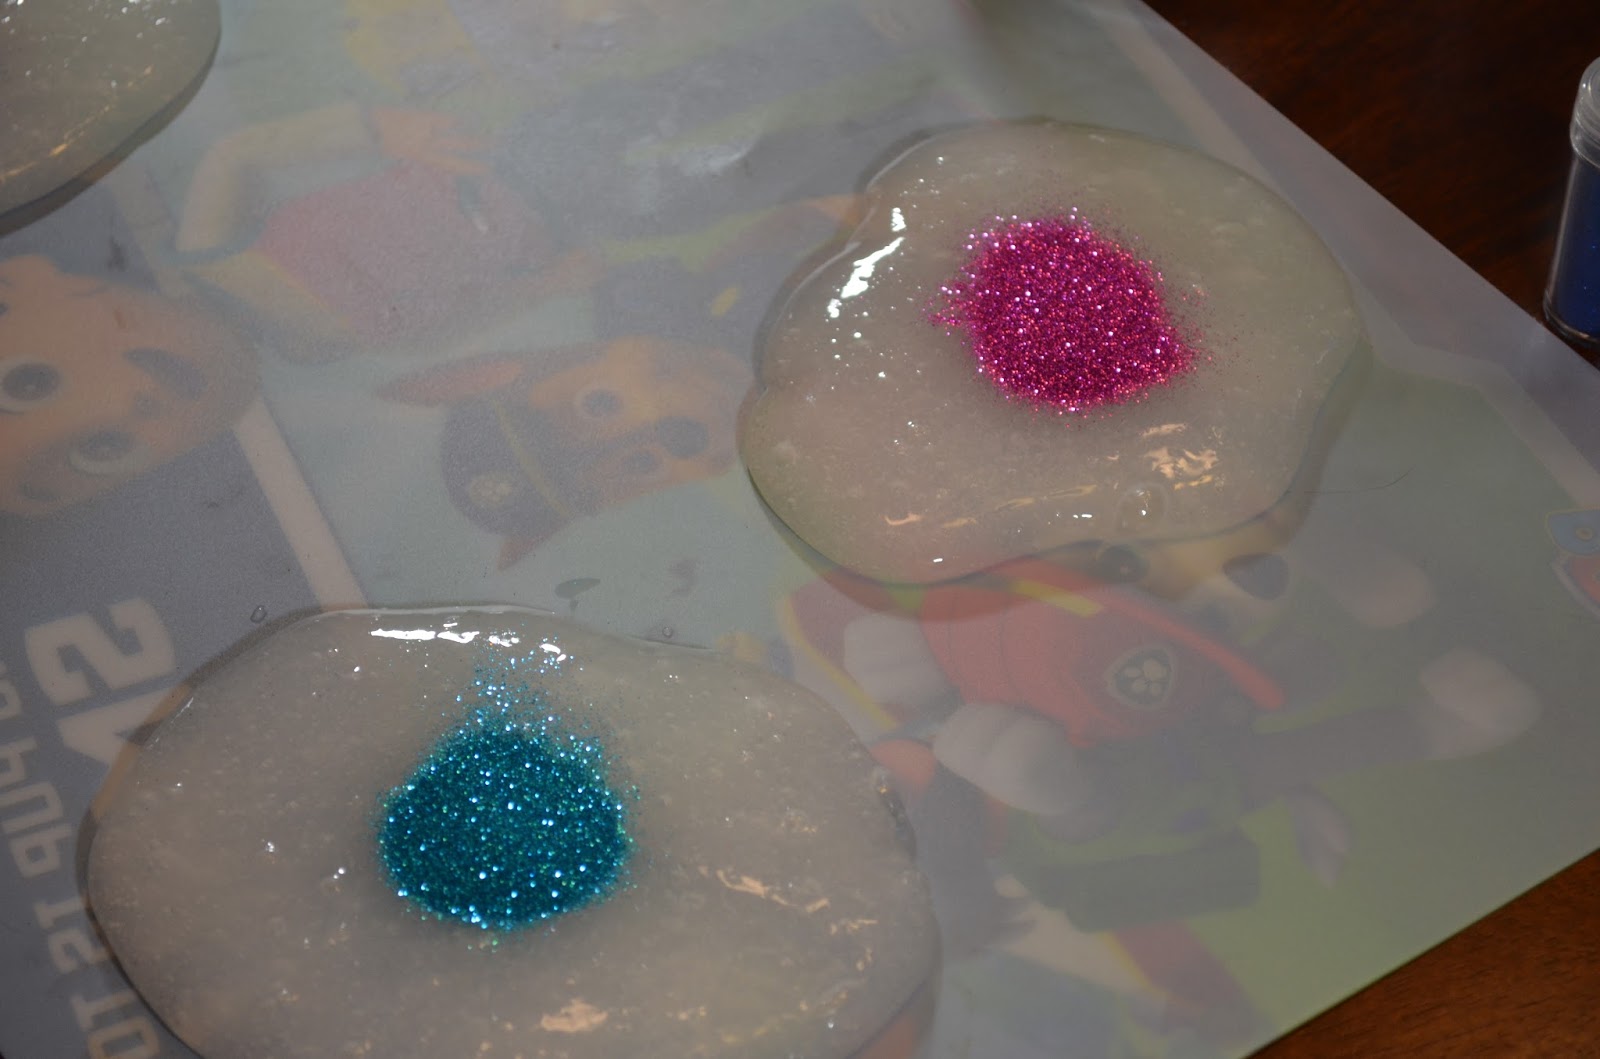
I added glitter by piling it in the middle then folding over to create a pocket, no loose glitter touched hands or work surface

     If you followed step 4 unabashedly like I suggested, you now have a clear-ish slime that doesn't stick to your hands or hard surfaces.  Now is the time to add in glitter.  I found the cleanest way to do this was to flatten out the slime, add a heap of glitter in the center and fold the slime over on itself to entrap the glitter in a pocket.  Then simply knead and work the slime until the glitter is evenly distributed throughout.  


Create unique color combinations by mixing glitter 

    I should mention that I divided the slime mixture out into 4 individual colors.  Gabe decided to mix one giant batch.  The only difference is the amount of glitter required to get the full color effect.  If the intensity of the glitter isn't to your liking you can certainly add more.  You can mix colors to obtain a galaxy or rainbow like effect.  It's really up to you.  


Finished product - All 4 of these colors were made with one divided batch of slime

Step 6:  Storage and Play Precautions:

The peanut gallery didn't partake in the creation of the slime but did play with it afterwards (make sure littles don't eat slime)

     We found through playing with the slime, if it comes into contact with any paper products (in this case a paper towel) it will be impossible to remove.  Therefore slime shouldn't be used around books or important documents.  

     Cleanup of any slime residue was very easy with warm water and a little soap.  The twins got in on playing with the finished product and got some on their clothes (little scraps they pulled off that landed in their laps).  It cleaned up with some warm water. 

     For storage we placed the slime in some zip lock baggies to keep the air out.  As of yet there hasn't been any issues with drying out, although I'm sure with time and continued play the slime will eventually dry out. 


Final Grade and Thoughts:


     This was a complete and total success!   Not only did the slime turn out exactly as expected, but we had a blast as a family making it.  There was a period where the mixture was really sticky and I was concerned that perhaps the ratio of ingredients were off, but true to the tutorials word, the more you mixed and played with the slime, the better the texture got. 

    I asked Gabriel what he thought of the project once we were done, and if he had any suggestions for those of you who are wanting to try this yourself.  Here are some of his thoughts:

 "Making slime was AWESOME!"

"It's kind of messy, you should use a plastic place mat"

"It's gross but feels kind of good" (when we were mixing is while it was very sticky)


    Thank you so very much for stopping by!  If you have a Pinterest  idea that you would like me to test, leave the idea (and preferably a link)  in the comments section below!  Don't forget you can also follow me on Instagram (VPNilausen), Twitter (HawkimamaV), or join me on the A Beauty In The Chaos's Facebook page (here) for additional conversations and fun.  I will see you next week! 


Tuesday, December 29, 2015

The Pintertest Files: DIY Erin Condren Cover


     Hello everyone and welcome to the inaugural episode of the Pintertest Files!  Where once a month I select a crafty DIY Pinterest post, try it out myself, and report back if it worked, if it was easy, or if once again Pinterest lied to us.  

     Since we are quickly coming up on the new year, for this month's Pintertest I have selected a DIY cover for the ever popular Erin Condren LifePlanner.   If you are unfamiliar with these day planners you can check the brand out here.  Essentially they are a nice and almost completely customizable day planner.  They have removable, plastic covers that you can swap out for different designs, but each cover comes with a pretty heft price tag (starting at  $10.95).  So of course when I saw that there may be a way to make these covers yourself, I had to try it out.

The following DIY is based on real life events, names and places have been changed to protect identities.  Viewer discretion is advised.

What You Will Need:


Materials needed as listed by original Pinterest tutorial

  • Erin Condren LifePlanner
  • Pretty Paper/Photos
  • Scotch Self-Seal Laminating Sheets, size 8.5"x11"
  • Scissors
  • Paper Hole Punch 
  • Ruler
  • Marker or Pen
  • Optional - double sided tape


Step 1: Measure and Cut Paper to Match Original Cover Size

Measure the inside "design" aspect of the cover, not the plastic.

     This is fairly straightforward and easy, simply measure the design element within the original cover (the paper part not the plastic) and cut your new paper to match that size. 


Step 2:  Use Tape to Adhere Outside Cover Paper to Inside Lining Paper

Front cover design and inside lining. 

     This step was labeled optional, and to be used only if you were planning on using a different design of paper for the inside lining of your cover.  This step can be skipped if your cover will consist of only 1 sheet of paper. It was suggest that if you are making a collage of photos for your cover, you adhere them to a backing piece of paper. 


Step 3: Laminate The Outside Part of the Cover

First layer of self laminating material, adhesive side up.

     Pull the backing off one sheet of self laminating material.  Place it flat on the work surface, adhesive side up. Next, take your design paper and lay it front side down in the middle of the adhesive sheet.  Leave plenty of adhesive material exposed as a border around the paper. 

Application of the first layer of laminating material.

     Again this step was fairly straight forward.  The laminating sheets are really static-y and as such want to fold over on themselves when pulling the back off.  If proper care is used it shouldn't be an issue, more of a minor annoyance. 

Step 4: Laminate the Inside Part of the Cover

Application of the second layer of laminating material, cover paper 'sandwiched' between sheets. 

    Pull the backing of a second sheet of self laminating material.  Slowly and carefully place it, adhesive side down, over the paper and first sheet of laminating material.  This will create a "sandwich" of laminating material with your designer paper in the middle.  Press firmly to remove all air bubbles, and seal around the edges of the paper where the two laminating sheets meet.

     This was a bit trickier as you only have ONE shot at this, so you better do it right.  Once the laminating sheets are down, there's no pulling them back up or apart.  Immediately upon pressing out all the bubbles, it became apparent that a larger clear plastic border will be necessary for this cover (vs the original), as the thickness of the paper prevents the two laminating sheets from meeting up immediately at the edge of the paper.  

Step 5: Trim Excess Plastic Away 

Front and back covers, fully laminated and excess plastic trimmed. 

     Trim the excess laminating material away.  Leave 1/2" margin on the side for hole punches, the remaining 3 sides leave a 1/4" margin. 

    Even though this step went off with out a hitch, it was at this time I start doubting the structural integrity of this project.  The original cover that comes with the planner is so much thicker and sturdier.  It's obvious that some kind of thermal plastic is used, not the flimsy plastic sheets utilized in this tutorial.  My original cover is showing some wear and tear on the corners and on the punched part where it connects to the spiral planner. If the thick plastic of the original cover can't hold up to daily use, no way is this flimsy laminate material going to. 

Step 6: Mark the Locations Where the Punches Need to Go

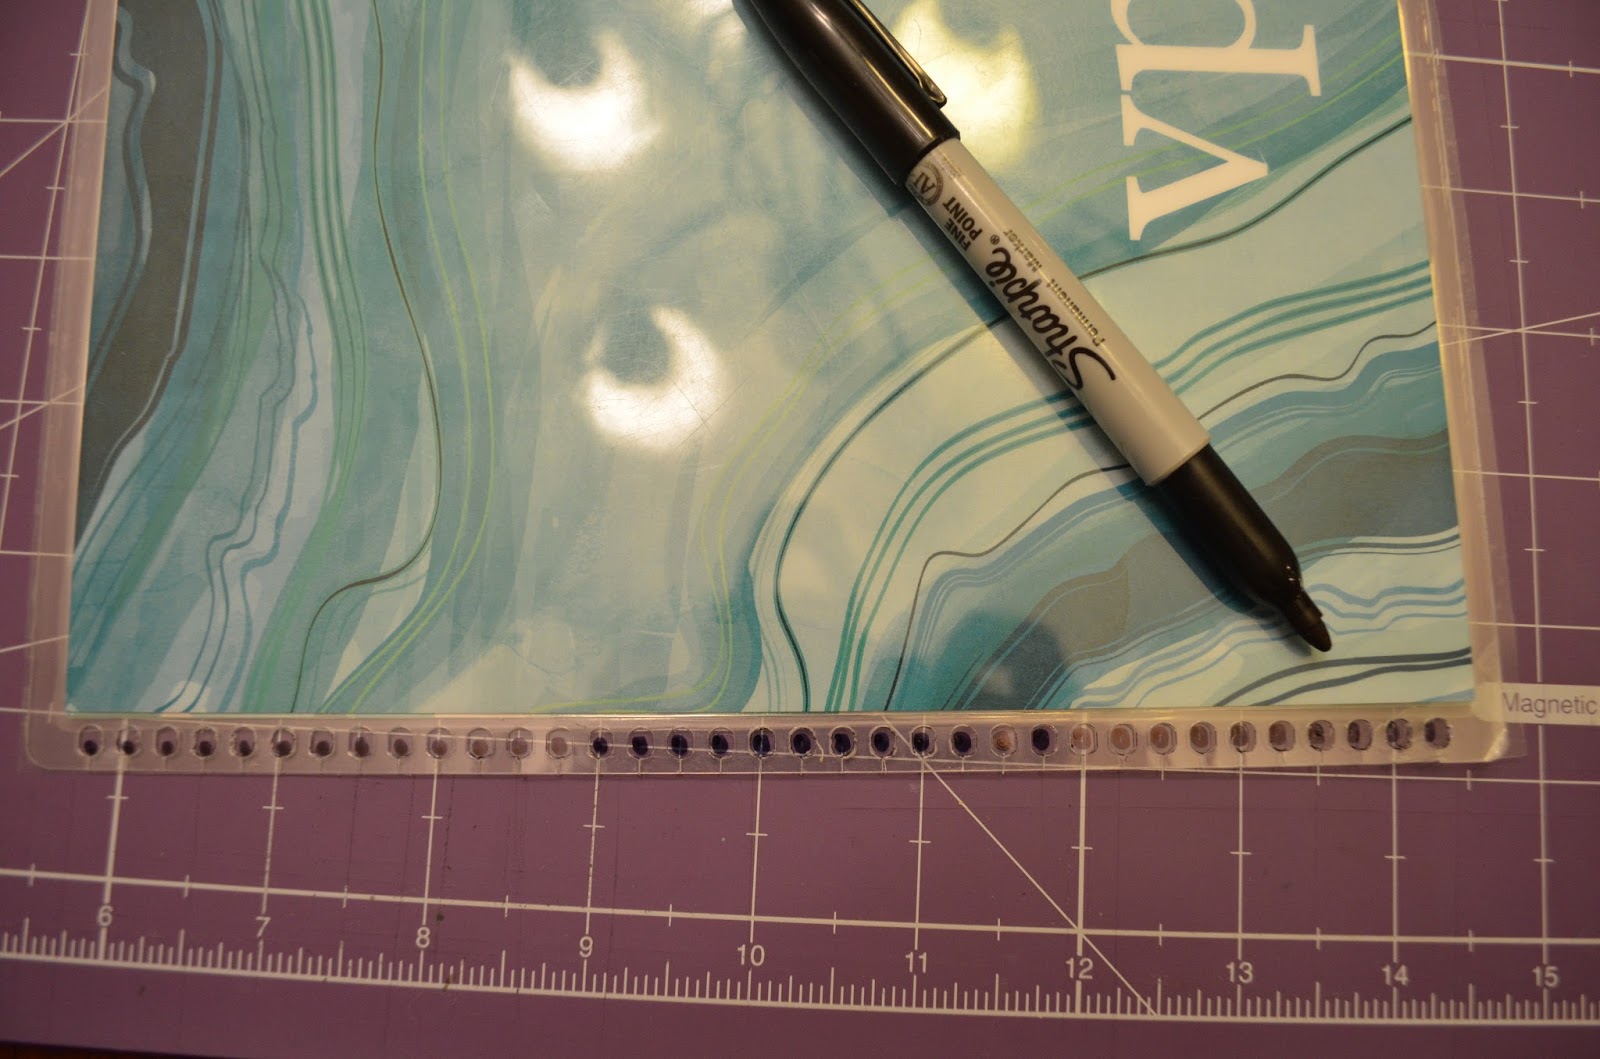
Marking hole punch locations using original cover as a template. 

     The beginning of the end. It was at this step that I recognized the first big mistake in the DIY instructions.  The holes on the original cover are not basic hole punch holes, but rather are made with a professional binding machine.  This is to be expected, clearly a company would use such a machine vs having a bunch of people hand punch holes in the covers.  However, the holes in the machine punched covers are smaller than a standard hole punch and the holes are oval, not circular. 

     Immediately it was obvious that the standard 1/4" hole punch was going to produce holes WAY TOO large for this project.  I quickly wrote this off as my own mistake, that I somehow overlooked instructions where it stated that a 1/8" craft punch should be used.  But no, the instructions didn't say anything specific about size, just "hole punch."  

     Also this tutorial claimed all materials could be found in discount stores such as Target or Walmart.  Just to explain the hole punch debacle, I actually bought a brand new hole punch from Target (a nice craft one) as my previous hole punch was lost somewhere in our move.  There was no size option just a cheap silver version vs a more expensive model. I splurged for the craft version. 


Step 7: Punch Out Marked Holes With Paper Puncher aka Where it All Went Down In Flames

First few punches produced less than stellar results. 

     Despite the issues with the hole punch size, I decided to move forward with the project.  I don't like to toot my own horn, but usually I can figure out ways to make things work.  I thought at worst perhaps I punch out over other hole to make up for the increased size.

Crafting punch, purchased at Target.  

     In hindsight I should have just threw it all away and set it on fire because the next 15 minutes of my life were nothing but a blur of jammed punches, cursing and vowing never to do another project again.  Ok, maybe that's a bit dramatic, there WAS cursing though.  

Example of how the plastic material would jam the hole puncher. 

     I don't know what type of black magic voodoo cursed crafting wizard the original author of the tutorial was, but there is no way in hell that plastic laminate material was going to cut cleanly with a paper hole punch.  There is just no way.  The plastic was too flexible.  Most of the time it stretched and ripped before the punch could cut it cleanly.  Several times it jammed up the punch, requiring me to use considerable force to pry it open.  

Final result of jammed hole puncher.  Note how the plastic stretched, then tore. 

Project Grade and Final Thoughts:


     There are different types of laminating material offered by Scotch.  Including a self laminating pouch and a thermal type that requires a laminating machine.  Maybe one of those would work better?  Maybe if I had a different paper hole punch?  Or maybe the original author sacrificed a goat to the Martha Stewart gods and is now blessed the ability to work crafting miracles (I'm voting on the later).

   
   If you have a Pinterest project that you would like me to test, feel free to comment below or email me at ABeautyintheChaos@gmail.com.  Thank you so much for stopping by!  See you next week! 

Twitter Delicious Facebook Digg Stumbleupon Favorites More