Showing posts with label Eyeshadow. Show all posts

Tuesday, November 10, 2015

Holiday Palette Reviews: Smashbox, Tarte, Buxom


     Ah November, a beauty junkie's favorite time of the year, and the bane of their bank account.  Yes, the holiday palettes and gift sets are out and just begging for an impulse purchase.  Teasing us with their limited edition colors and quantities.

     This year I tried to do better.  Well, ok by "better" I mean I tried not to get just a boatload of eye shadow palettes, but rather select a palette from each category of eyes, lips and face.  It had varied results, there are just too many tempting eye shadow palettes out there.  However today, I will stick to my original plan and share my thoughts on one from each category (I will have more in upcoming posts I promise).


Smashbox ART. LOVE. COLOR. Master Class - $65.00


Smashbox ART. LOVE. COLOR. Master Class package inspired by artist Yago Hortal

     Available exclusively at Sephora, this years Master Class palette is inspired by artist Yago Hortal and his colorful designs. The kit comes with 32 Photo Op formula eye shadows in a 0.025oz size, 6 blushes that are 0.05oz, and 2 highlighters that are 0.07oz but look the same size as the blush.  It also comes with a set of 8 instructional cards as well as a small bio on Yago Hortal. 

Smashbox Master Class palette opened up, each tray is removable with names printed on clear covers

     The packaging is rather interesting.  The design is beautiful and very colorful, but rather bulky and not what I would call travel friendly. The products are located in two plastic trays which remind me of CD cases.  The trays are removable (which would be better for travel), and have the names printed on the clear covers which snap shut.  When open the palette lays flat, which is helpful as it is not held easily in one hand during application.  There is no mirror (I don't know where they would have put one) but again, it makes it less travel friendly.

Left Picture: left to right Posy Pink (cheek), Naked, Charmed, Candy, Framboise
Right Picture: left to right Java, Oxidize, Nutmeg, Alabaster, Sunset (cheek)

     I picked this palette up as a possible alternative to the Kat Von D palette that is sold out every time I go to Sephora.  I don't have much in the way of colorful eye shadow (most of what I own is akin to the Naked palettes by Urban Decay), and I was looking for an introduction to some brighter colors. As an introductory palette, I think this works nicely.  If you are someone more experienced and wanting intensely pigmented colors, I don't think you will be happy with this palette. 

Left Picture: left to right Persimmon (cheek), Custard, Torch, Goldenrod, Gold
Right Picture: left to right Gypsy, Spruce, Zoom, Sea, Glow (highlight)

    The color selection and formula is... safe for lack of a better word.  The formula is very soft (it will kick up powder when you dip into it) and blends out easily when applied dry.  The result is more of a wash of color rather than an intense bold application.  Which is great for beginners who want to ease into color.  The colors can be built up or used wet to achieve a bolder look, but it will take some extra work.  In that sense I don't find this a suitable alternative to palettes like the  Kat Von D where the pigmentation is more intense and less forgiving. 

Left Picture: left to right Bitten (cheek), Sky, Nile, Azure, Pacific
Right Picture: left to right Harbor, Steel, Cement, Cosmic, Prism (cheek)

   There are a few shades in this palette that I did not like at all.  Charmed, Sea, Cosmic and Silver Moon which are the chunkier, more glittery shades.  I would imagine that use of a glitter shadow glue would help with application. But seeing as I so infrequently want a glittery look, the extra work isn't worth it for these shades.  Everything else did apply smoothly and evenly, including the blush and highlight shades.  As I mentioned before they do kick up some powder, so just be sure to tap the excess of the brush to avoid some fallout during application. 
    
Left Picture: left to right Plum (cheek), Breeze, Celestial, Eggplant, Orchid
Right Picture: Ebony, Smoke, Silver Moon, Snow, Shimmer (highlight)

Tarte Bling It On Amazonian Clay Blush Palette - $44.00

Tarte Bling It On Amazonian Clay Blush Palette 

     Available exclusively at Sephora, this year's Tarte blush palette features 4 limited edition blushes (Dollface is the only one featured in the permanent line).  The full size, stand alone blushes cost $28.00 a piece and are 0.20oz. The blushes in this palette are 0.15oz and there is 5 of them, meaning the palette contains roughly $105.00 worth of product.  For this reason the Tarte blush palettes are always big sellers each holiday season. 

Tarte Bling It On palette blushes in Fetching, Dollface, Prim, Smashing, and Beaming

    The packaging is a slim and the cover is magnetized.  There is a decent sized mirror inside making it travel friendly.  The only thing I do not like is the black glitter on the outside.  While it looks very pretty, the glitter flakes can easily falls off and with continued use I imagine it will get worse. 

Tarte Bling It On blushes left to right Fetching, Dollface, Prim, Smashing and Beaming

    Personally I am a big fan of Tarte's Amazonian clay blushes.  They are well pigmented do last a considerable bit of time on me.  The color goes on semi-sheer and can be built up.  For us fair skinned ladies this is super helpful as it helps prevent the dreaded clown face. 

     The colors featured this year are very flattering and easy to wear.  The only shade I do not like is beaming as it has chunky silver glitter in it.  Why would they ruin a beautiful peach shade with silver glitter?  Who knows.  Maybe someone can use it as a highlight?  Not this lady.   The remaining 4 shades all have a matte or satin finish.
    

Buxom Leave Your Mark Full-On Lip Polish & Lip Cream Set - $59.00

Buxom Leave Your Mark Full-On Lip Polish & Lip Cream Set Packaging

     Again available exclusively at Sephora (I swear this post is not sponsored lol), this set features 8 mini sized lip polishes and 8 mini sized lip creams.  Each of the minis are 0.07 fl. oz and come with the standard doe foot applicator.  For comparison a full size of one of these lip glosses is 0.15 fl oz and cost $19.00. 

Buxom Lip Gloss swatches left to right: Hot Toddy, Bunny, Cherry Flip, Taylor, Dolly, Jennifer, Sophia, Purple Haze

     For those who have never tried a Buxom lip product before, the formula of these glosses feature a menthol derivative that gives the gloss a minty scent/taste and creates a tingling/cooling feeling on the lips.  The formula is very smooth and the tingling/cooling feeling does last for a bit on the lips.  It doesn't burn, but it is noticeable.  The best I can describe it is when you eat a strong mint like an Altoid or Life-Saver and you suck air in.  That cool tingle?  That's how your lips will feel.  I personally love it, but know some girls that are bothered by it. 

Buxom Lip Gloss swatches left to right: Zoe, Starr, Sandy, White Russian, Berry Blast, Olivia, Pink Lady

    Each of the colors in this kit are also in the permanent line.  There are no exclusive or limited edition shades featured, so if you fall in love with a particular color you should be able to get a full sized version.  True to most glosses, these offer a general wash of color but are not intensely pigmented.  The polishes feature anywhere from a fine shimmer (Sophia, Sandy) to a chunky glitter (Oliva, Starr).  The glitter doesn't affect the feel of the gloss, but I have found it does hang out on your lips after the product has worn off.  The creams are a flat glossy color and feature no shimmer or glitter. 

    Overall, this is a nice lip gloss set.  Is there anything super amazing or special about it? Other than the large sampling of colors, no.  I purchased this mainly because loving the glosses already, I wanted to expand my color options without purchasing the full sizes.  If you know that a bunch of these colors aren't going to work for you, or you don't like the glitter in the polishes, you might be better off purchasing a smaller holiday set or a few individuals in the full sizes. 


That is all I have for today.  Like I mentioned previously there will probably be another post in the near future with reviews on some other palettes I picked up (nothing big though, these were the main three I purchased this year).   Thank you all for stopping by and I will see you next week! 


Monday, November 2, 2015

October Ipsy vs. Boxycharm: Unboxing and 1st Impressions


     Hello everyone, and welcome to November!  To start off this month I want to try something different than I have done before and share what I have received in my Ipsy and Boxycharm subscription boxes.

     If you are unfamiliar with beauty subscriptions, the down and dirty explanation is that you fill out a questionnaire and based on the answers provided you are sent a box of surprise goodies each month. Depending on the service to which you subscribe, the goodies may be sample or full sized and be drugstore or high-end brands.  It's a really fun way to try out new brand and products that you haven't heard of or may be reluctant to buy on your own.

     I subscribe to two of these boxes, Ipsy and Boxycharm.  They are probably two of the more well known beauty subscriptions.  If you are interested in either of these, I have links to each service in my favorites tab here.  I pay for these boxes myself and any referrals I make with those links just awards me points to get additional products.  You can chose to use those links or not, it's up to you.

Ipsy 

October Ipsy Glam Bag "Alter Ego" 

   
     The Ipsy subscription is $10 a month.  There is always a little cosmetic bag included and usually contains 4-5 products.  The products are more often than not sample sizes and are a good mix between high end and drug store products.

     This month (October's box) the theme was Alter-Ego.  It came with a duo-sided bag one side a metallic gold and the other a shiny black vinyl.  The products it contained were:
  • It Haircare 12-in-1 Amazing Leave-in Treatment - full size
  • LeeAnni Eco Go Away Gloomy Day Skin booster - Sample 0.5fl oz 
  • MICA Beauty Cream Eyeshadow in Bronze - full size
  • Girlactik Beauty Precise Eyeliner Marker in Black - full size
  • the Balm Meet Matt(e) Hughes Liquid Lipstick in Committed - sample 0.04fl oz
     I was pretty surprised by this month's Ipsy bag.  Usually I get more sample sizes with this subscription and the majority here are full sized products. I am most excited to try out the liquid lipstick and the eyeliner.  The pinky-nude color of the lipstick is one of my favorite day to day colors, and it has a strong minty smell that I also really like.  The eyeliner I am interested in experimenting with as I do not have a lot of liquid type eyeliners.

the Balm Meet Matt(e) Hughes Liquid Lipstick in Committed
    The eyeshadow color is nice.  I don't often wear this color of bronze as it pulls really orange on my skin.  I also don't wear cream eyeshadow all that often so we will see how this one goes.  I really like that I got a full size bottle of the leave in treatment for my hair.  Often times sample sizes for hair products do not give me enough uses to determine if I really like it or not.  

MICA Beauty Cream Eyeshadow in Bronze

    The skin boost I could take or leave.  I don't really understand what it's primary goal is other than to "boost skin" whatever that means.  It's an organic product with no preservatives which I know is a bonus for a lot of people.  There is warning on the side of the bottle that states it should be discarded within 6 months of purchase.  That kind of turns me off as I am currently trying out some other skincare items and I don't want this to expire by the time I get around to trying it. 


Boxycharm

October Boxycharm "Faces of the Moon"

     Boxycharm costs $21 a month.  So it is twice the cost of the Ipsy subscription.  However this is almost entirely high-end makeup and a lot of it is full sized.  In fact every thing I got this month is a full sized product.  A nice thing that Boxycharm does, that Ipsy does not do is tell you how much the price of the full sized product is.  So you can keep a running total of how much you have spent vs how much the box is "worth" to you.

     This month's theme was Faces of the Moon and it included the following products:
  • Palmetto Derma Rejuvenating Antioxidant Mask - full size - $64.00
  • Doucce Punk Volumizer Mascara  - full size - $24.00
  • Bellapierre Cheek and Lip Stain in Coral - $19.99
  • Lord & Berry Line/Shade Eyeliner - full size - $18.00
  • Cult Cosmetics Nail Polish - full size - $12.00
     So as you can see the value of the products you get far exceed the cost of the subscription box, which is nice if you want to try a number of high end products without fully investing in the cost.  I am probably the most excited for the Palmetto mask.  At $64.00 it is not something I would have ever bought myself, but it actually looks really nice and it smells fresh.  

     The mascara and the blush look interesting. I don't have much experience with the creme blush formula so there may be a bit of experimenting to do.  It may have to wait until spring as the coral color, while pretty, just looks better suited for spring/summer.   I love trying out high end mascaras but very rarely do I purchase them as I find that for my lashes drug store formulas work just as well. 

Bellapierre Cheek and Lip Stain in Coral 
      I am not very interested in this eyeliner.  It's a basic black pencil liner, not particularly dark.  It blends out very easily, which I am sure is due to it also being promoted as a shade, but I know for my eye type it means it will not stay put and most likely run.  


   So that is all that I got.   I know everyone gets something different depending on what their answers were on the questionnaires.  It would be cool to hear what others got in their boxes, if you would like to share you can put it in the comments below.  Thank you all so much for stopping by and I will see you next week!  


Monday, October 26, 2015

October Favorites!


    Hello everyone!  Is anyone wondering where in the hell October went? I feel like I JUST put up my Halloween decorations, I haven't even begun to work on my costume and when I looked at my calendar I realized this week will be the last post for October. That means it's time for October favorites and how does one pick favorites for a month she's not even sure occurred?  Never fear, there has been some picks that have stood out this past month.  And here they are:


Books: Doctor Sleep by Steven King

Doctor Sleep by Steven King available at Amazon or any book seller

     Sequel to The Shinning, my favorite Steven King book, and possibly one of my top 10 favorite novels of all time.  Doctor Sleep picks up with Danny Torrance, now a middle-aged man following in his father's footsteps of alcoholism.  Still haunted by the events in his past, he finds work at a local hospice helping the terminally ill by easing their fears as they pass on.  On his way to recovery, he meets and befriends a young girl named Abra who's powers dwarf his own.  When he discovers that Abra is being hunted by a group that call themselves the True Knot, Dan must face his demons to save her. 

    True to any Steven King novel, the character development in Doctor Sleep are detail rich and lengthy.  King's ability to so precisely paint a characters portrait in words is both his greatest achievement and his biggest downfall.  Often times I find myself really struggling with some of his work. Especially when the development of the characters don't seem to pertain to the overall plot of the novel.  That was not the case here.  

     Perhaps it's because Dan Torrance is already a character most readers are already somewhat invested in having already read (or watched) The Shinning.  More likely it's because here King does such a great masterful job in intertwining the development of the characters with the overall plot.  We understand the direct affect Dan's struggles with alcoholism has on the outcome of this girl's survival. Instead of being bored or annoyed with one of the many inner monologues they are welcomed, encouraged even as we root for Danny to overcome what has plagued him for so many years. 

    Finally what also makes this book stand out is it's ability to stand on it's own.  Yes, while it is a sequel, it is not a simple continuation of the story.  Those who have not read The Shinning, might miss out of some of the more nuanced references in Doctor Sleep, but they can still follow and enjoy the book.  


Movies/TV: The Walking Dead

The Walking Dead, Sundays at 8pm Central on AMC

     October saw the return of quite possibly my most favorite TV show of all time.  I struggled with making this one of my picks because it is so incredibly obvious and popular. There is really no way that someone could be reading this blog and think "my God.. what is this Walking Dead show she speaks of?  I must find out for myself!"

    No. I'm not introducing anyone to this show. We all know what it is, and what it's about.  If you like it, you already watch it.  If you don't, you have probably seen it and know it's not your particular brand of zombie survival goodness. 

     That being said  Oh. My. God.  Has there ever been a show that I both love and hate so much at the same time?  I can not think of one, not even a movie or book series.  Each week there is a high probability that I will be cursing at my television and solemnly swear that I will never watch this "stupid show" again.  Yet each following week there I am, frantically putting my children to bed so that I don't miss the beginning minutes of the new episode.  It's visual crack and I am addicted.  So you see, there is really no way that I couldn't make this my pick this month. 


Music: Monthly Mixed Tape Halloween Edition


     Mmmm Halloween.  Yes. While most think of 'holiday' music is limited to that of the Christmas variety, there are some audial gems that need to be celebrated come Halloween time.  Here is my must play list for the spooky season:

  1. Thriller - Michael Jackson no lie, this video and song scared the CRAP out of me as a kid
  2. I Put a Spell on You - Screamin' Jay Hawkins
  3. Season of the Witch - Donovan
  4. This is Halloween - The Nightmare Before Christmas the Burton/Elfman team had a love child with Dr. Seuss and the result was magical
  5. Werewolves of London -Warren Zevon 
  6. The Devil In I - Slipknot
  7. Cry Little Sister - Seasons After Yes, this is a cover of that song from The Lost Boys and yes, the video is tragically corny, but the song is good.
  8. Time Warp - Rocky Horror Picture Show
  9. Somebody's Watching Me - Rockwell
  10. Dragula - Rob Zombie  


Makeup: Makeup Geek's Matte Eyeshadow

Makeup Geek Matte Shadow Collection, $6.00 each at MakeupGeek.com

    While one is overwhelmed in quality choices of shimmer and glitter shadows, if aging has shown me anything it's that a quality matte finish shadow that comes in a range of colors is a rare find.  Even high end brands can fall short when it comes to matte eye shadows, with formulas that are either chalky or hard to blend. 

   Imagine my surprise when I tested a selection from the  new line of matte shadows from Makeup Geek and found them to be not only well pigmented, but easy to work with and apply.  All for the very reasonable price of $6.00 per pot. Better yet, they come in a wide range of colors.

  Not that I should be surprised.  I am rarely disappointed with any of the shadows I have picked up from MakeupGeek.com.  Marlena, the brainchild of the Makeup Geek site and brand, has made it her goal to educate women on cosmetics. She regularly posts easy to follow makeup tutorials and product reviews (both high end and drugstore) on her YouTube channel.  The products she has helped develop are a good quality without being cost prohibitive and her site offers color swatches on both light and dark skinned models.  I'd highly recommend any of the Makeup Geek shadows to anyone who wants to expand out past what the drugstore has to offer, but doesn't want to make the financial commitment to high end brands. 


Home Decor: Pumpkin Pecan Waffles Candle from Bath & Body Works

   
3-Wick Candle in Pumpkin Pecan Waffles, $22.50 at BathandBodyworks.com


     I love fall scents. The warm notes that fill your house with woodsy outdoor scents or freshly baked goodies.  Mmmmm sometimes it makes me hungry...  

     Anyway,  Pumpkin Pecan Waffles is probably my favorite selection of the bunch as it has notes other than just the pumpkin spice.  The 3-wick  candles, available seasonally at Bath & Body Works (bathandbodyworks.com) can be pricey ($22.50) when not purchased during a sale. Thankfully there is usually a sale either ongoing or quickly coming up where they can be purchased at 2 for $24.00.

     Another more cost effective option is purchasing this scent in the wallflowers fragrance plug ($6.50 normally, 6 for $24 on sale).  Which is usually the route I go as I don't trust my kids or my cat around open flames.


     That is all I have for this month.  Thank you so much for stopping by!  As always, feel free to share your thoughts or your own pick for October in the comment section below.  Have something you think I should try out? Let me know - I might just write a post on it.  

See you next week! 


Tuesday, September 1, 2015

5 Reasons to Put ColourPop in Your Life


Have you heard of ColourPop? Chances are that you have not. Unless you live part of your life on beauty blogs and YouTube like I do (hey I have to actually do something when I'm hiding in the bathroom from my kids).  Only available at www.ColourPop.com, this brand is a relative newbie on the beauty scene, but what an impression it is making. Below I have assembled the top 5 reasons why I feel you should check out this brand and some swatches to show you some of the products.

1. It's Cheap

Not in the "I found this in the clearance bin. It doesn't quite match but I'm gonna make it work because it was only 50 cents" kind of way.  But rather in the "I can buy a decent amount of this and still afford my car payment" kind of way.  A single eye shadow or lippy (lipstick), or lip pencil  will set you back $5.00, a blush or highlighter will cost you $8.00.  That's right at, or just below what I usually pay for drugstore brand makeup (L'Oreal, Maybelline, etc).  Plus when you first shop at the site, they give you a $5.00 gift code for signing up for the newsletter.  Hello free product! The cost is even more impressive when you consider the next two reasons...
2. The Formula is Good

Really good. The pigmentation is superior to most drugstore brands, and the products wear evenly with minimal creasing or fading.  The lipsticks (especially the mattes) are a smooth but heavier formula for longer lasting wear. I found them to be a little bit on the dry side if worn alone, but paired with a lip balm or gloss they were perfectly comfortable.  The formula for the shadows and blushes are what is truly unique.  When touched they feel like a cream or gel, but when applied they blend like a powder.  The result is a product that requires less building up of layers to achieve a saturated color, while also being blendable enough that even the most mistake prone (raises hand) can apply worry free.  Because of this unique consistency I found it best to apply first with my fingers, then blend out with a brush or sponge.  It may seem awkward at first, but again mistakes are easily blended away.

3.  Made in the U.S.A.

That's right, in our very own country.  They are also cruelty-free. Admittedly I am not the most discerning person when it comes to the location of cosmetic manufacturers.  I usually make decisions based on how a product works for me, not where it was manufactured.  But given the option to purchase products I like AND help support jobs here in America all while keeping the animals out of the latest lip trends...well that just gives me the warm fuzzy feelings.

4. Fun Color Selection

Have you been looking for a lime green shadow?  How about a deep purple lippy?  If your answer is yes, then ColourPop is for you.  The colors range from tame neutrals to extreme neon with a good selection of finishes as well.  Given the relatively small cost, this brand is a great source to tap into when wanting to try out a new trending look without breaking the bank.

5. They Appreciate Their Customers

In the delivery of each and every order I've made I have received a hand written thank you card with a fun little saying.  I still remember my very first order's card said "You are a beautiful cupcake in a world full of muffins." Cheesy? Yes.  Did it work? Oh hell yes!  Gone are the days where a company actually makes you feel like you did them a solid for shopping with them.  More and more often I don't even get a packing slip, much less one that had a computer write out a generic "thanks for your order". So to get an actual hand written thank you? That demonstrates to me that they take that extra step to show how much they appreciate their customers, and that is something that will win me over time and time again.


Ok do I have you convinced yet?  How about I show you some of my personal favorites from their collection.

Eye Shadows 


Acorn: A cool-toned light beige with a pearlized finish.


Bill: Muted plum-beige in a matte finish.  This is my all time favorite transition color for my crease.


Cricket: Metallic finish mid-tone plum with glitter.  


Doe-A-Deer: A deep almost black violet color in a matte finish.  I love this for smoky looks.


Downtown: Cool-tone deep taupe color in a matte finish.


Fairfax: Matte finish deep brown.  I love this as a liner and to smudge out my lower lash line. 


Girl Crush:  A mid-tone gray color in a matte finish.  Another neutral color (seeing a trend?)


I Heart This:  Taupe with multi-color glitter.  Don't let the glitter scare you, in this shade it's a muted  
                       sparkle and very pretty on the lid.  Also I dropped the container, hence it being broken.


La La:  Described as a a rose gold with an ultra metallic finish, I find that this comes off more  
             coppery on my skin tone.  Still a beautiful color for warm summer looks. 


Mittens: A deep warm brown in a matte finish.  Great color to deepen a warm look with.  


Liberty:  A true silver in the ultra-metallic finish.  This is literally like liquid tin-foil on your eyes.  
               The picture does it no justice.


Bubbly: Candy pink color with silver and pink glitter. Admittedly I don't wear this one much, it is 
              very pretty, just not my color. 


Lippie Stix 


Cookie: Nude beige in a matte finish. 


Corset: A pink lavender color in the hyper-glossy finish.  I loved this color this past summer. 


Lumiere:  My favorite lippie so far!  It's a dusty mauve pink and I can only describe it as a nude pink                  with a little something extra.  It's in the matte finish and lasts a good while on my lips. 


Westie: Dusty baby pink in a matte finish. 


Tootsie: A matte greige (gray beige) color.  I bought this at the beginning of summer and have not 
              used it much.  I think it's better suited for fall. 


Cheeks


Between The Sheets: Mid-toned beige pink in a matte finish.  A good neutral color for adding just a                                      bit of warmth to your cheeks.  


Trickery:  Don't let the bright orange color fool you.  This is actually a pastel peach color with a satin                  finish (the finish doesn't show well in the photo).  This was my first attempt at coral colors                  on my cheeks, and I was really happy with the results (not clownish at all).


Smokin' Whistles:  This is a highlighter in a cool-toned pink champagne.  As someone with aging                                       skin I am super picky about my highlighters.  I love this one.   It is very finely                                       milled with no chunky glitter. It's really a nice color for the fair skinned ladies.  


Disclaimer:  All products featured were purchased by myself and opinions on products are my own.  This post is in no way sponsored, paid for or influenced by ColourPop. 

Monday, August 24, 2015

Taming the Eyeshadow Beast: A Guide to De-potting

I have an absurd amount of eyeshadow.  Absurd. And since it doesn't seem that I will be ridding of myself of this addiction anytime soon, nor am I magically going to be awarded a room entirely for my collection, I needed to find a way to save some space and organize my shadows.  Enter in the Z Palette. This cleaver little box allows you to take your shadows out of the original packaging and combine them into a custom layout of your choosing.  De-potting was admittedly a bit intimidating when I first researched it, but with a few tips and some patience it quickly became something I was comfortable with.  Below is the method I used which has worked best for me.  I stayed away from anything using an open flame as I personally think you are asking for a house fire and an awkward story for the firemen. Plus burning plastic is not a fragrance Bath & Body Works will be featuring any time soon. 

What You Will Need:


  • Z Palette, any size will do (available at http://zpalette.com/)
  • Magnetic Stickers (some will come with your z palette, otherwise magnetic tape will work)
  • Tweezers or a small spatula (purchased with my palettes, worth the extra cost IMO)
  • Eyeshadow, any kind or size
  • Flat Iron 
  • Paper Towels
  • Parchment paper or tin foil (either will work)
  • OPTIONAL: small stickers for labels and a fine tip marker

1. Get Rid of Excess Packaging. 

Most pots are contained in a tray that can be separated out from the rest of the packaging (the case that opens and closes).  Some are super easy to remove, for example the Urban Decay singles shown are designed to pop out to put into a palette that Urban Decay sells.   Others require some work.  Look at the packaging for seams and use your tweezers or spatula to pry the tray out.  Below I marked where I found it easiest to pry out the tray on the L'Oreal palette. 


This is what it looks like when I got the tray out:


2. Use Heat to Soften the Tray and Glue.

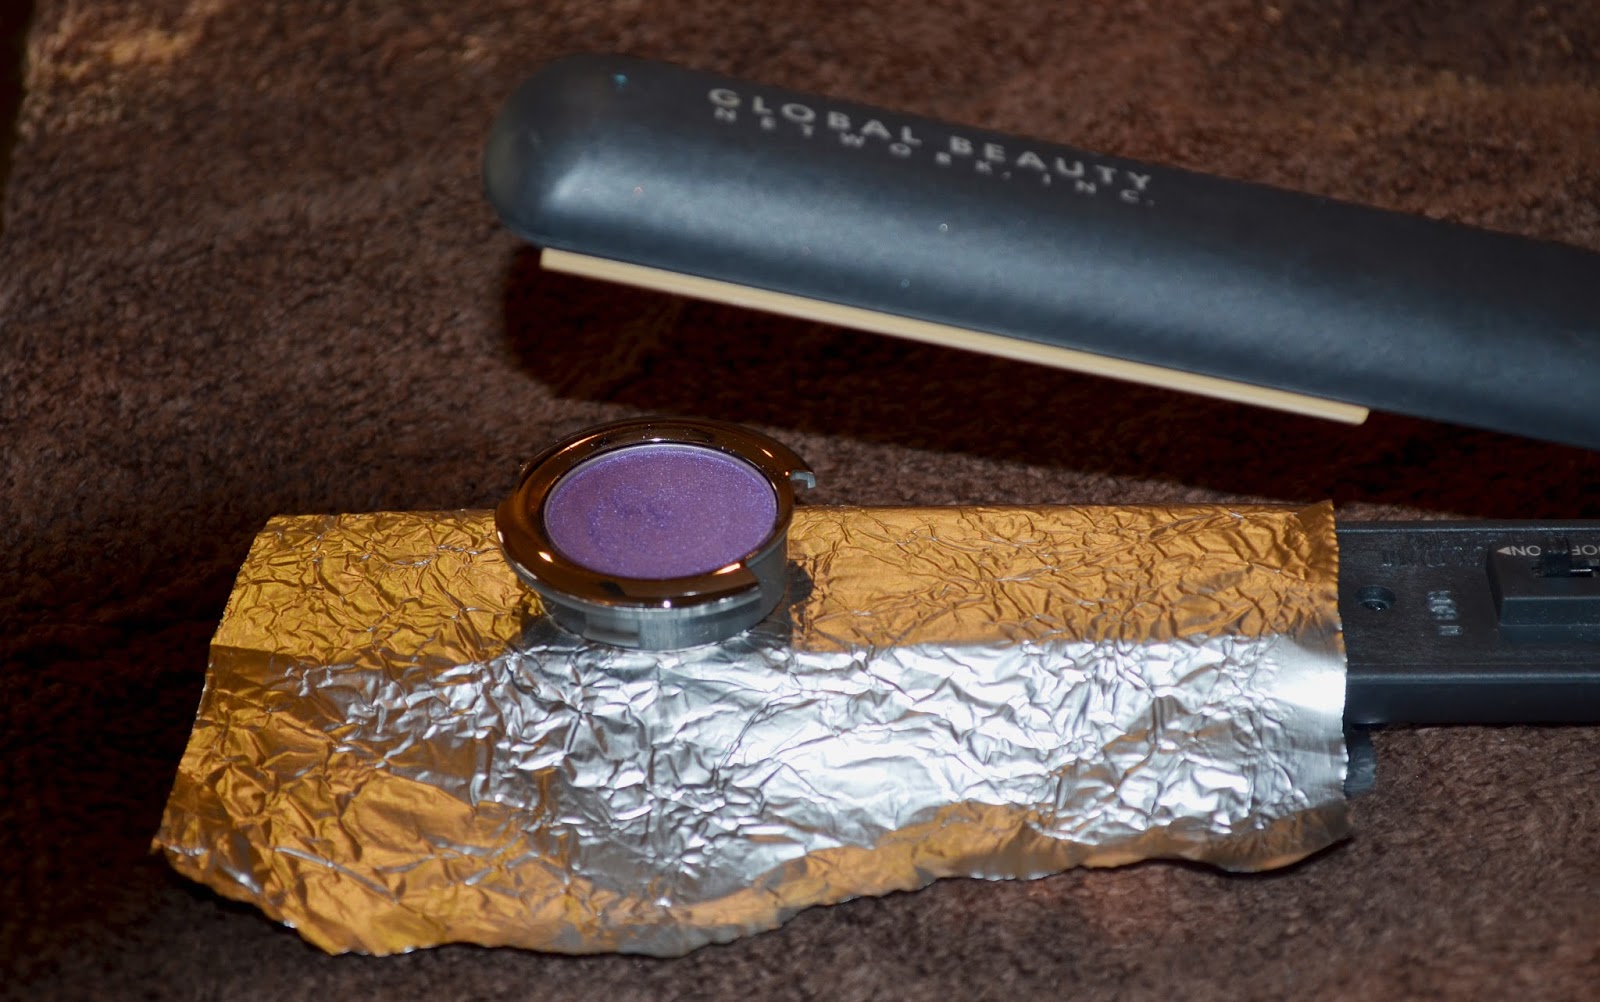
Put a strip of parchment paper or tin foil on your flat iron to protect the surface from adhesive and melted plastic.  Then set the tray down on the flat iron and let it start to heat up.  


The amount of time it will take for the plastic and adhesive to soften will vary depending on the material used in the packaging.  I found it best to check after a minute and a half to see how pliable the plastic was. If it was still hard I would put it back on the iron in increments of 30 seconds just to make sure the plastic didn't get so hot that it would make a mess or burn my fingers. 


3. Slowly Push the Pot out of the Tray.

WARNING: The plastic and the pot WILL be HOT - USE CAUTION!

When the plastic was ready it would look a lot like this:


The plastic has heated to a point where it is starting to warp and bubble.  It is also easy to push the spatula (or tweezers) through that material. 

I like to place the tray FACE DOWN on a paper towel on a hard surface.  I then carefully push my spatula through the back of the tray, pushing the pot out.  I find doing this helps in two ways.  1. Pushing it out from behind instead of prying from above means I'm less likely to accidentally gouge out a chunk of shadow with my spatula. And 2. I am less likely to burn myself on the plastic, or pot (they are usually metal and will be HOT) and thus less likely to drop the product and have it shatter everywhere. 

This is what it looks like when the pot first drops out.  You can see that I have pushed my spatula through the back of the tray a few times to get the pot to detach from the tray.


4. Cool and Clean Up the Pot.

There is often some residual adhesive left on the pot so I pick that off once the pot cools down.  It is probably easier to do this when the adhesive is still warm, but again, burning hot glue + me = dropped eyeshadow so I let it cool first. I also make a note of what the name of the product was so that I can label it later. 


5. Label and Arrange in the Z Palette.

Check to see if the pot is magnetic on it's own.  If not you can use magnetic tape or one of the little metal stickers that come with the Z Palette.  I also always use a little white sticker (purchased at any office supply store) to label the brand and what color it is.  If one was so inclined they could try to salvage the label from the product, but I found that too tedious ( I did the first one for Flash the top right shadow)

The Urban Decay pots are already magnetized so I just added a label sticker to the back:


Look I have room for ONE MORE Urban Decay Shadow.. it must be done!  I cant just leave it empty like that! 

Sometimes you will come across a nice surprise. For example while getting rid of the extra packaging on these Revealed palettes from Coastal Scents, I found that there was only double sided tape holding the pots to a piece of cardboard.  I didn't even have to use heat to remove them from the packaging! But I did have to be super careful not to twist the cardboard as these shadows are really fragile.  


That's it Happy De-potting!  I'd love to hear what you have done and how you have found ways to use your palettes! 

Twitter Delicious Facebook Digg Stumbleupon Favorites More